دي باترونات قفازات بس بالانجليزي تمنى تستفيدو منها اخواتي...
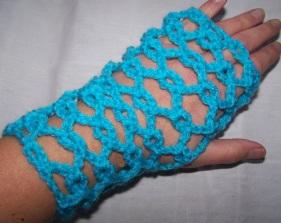
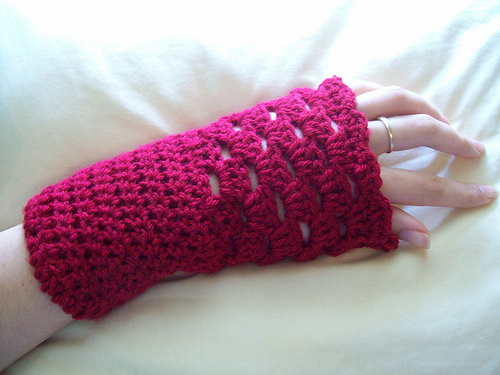
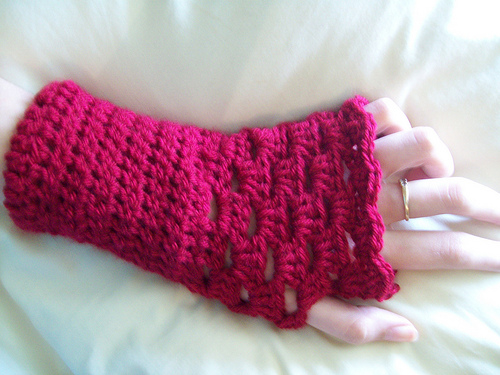
Afternoon Tea Fingerless Gloves
height = 248


#headlines_tile_left_0{ top:0px; height:400px; } #headlines_tile_left_0.headlines_tile_hover{ top:0px; height:392px; }
By Dora Ohrenstein
Free
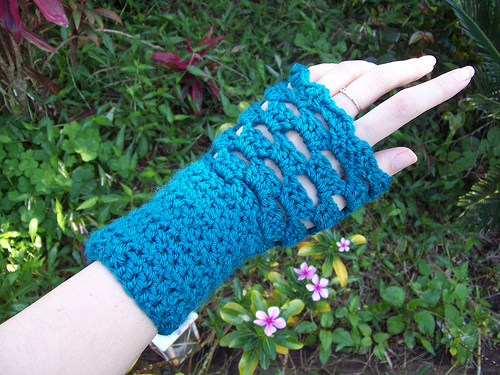
These gorgeous fine weight yarns by Tilli Tomas have brought out the lace lover in me. The two projects here each use ONE SKEIN only. In fact, you can make two pairs of fingerless gloves with one skein of Voile de la Mer.
SKILL LEVEL: Intermediate
SIZE: One size fits most
ONE SKEIN Tilli Tomas Voile de la mer, color Dusty Purple, fingering weight
B-1/2.25 mm crochet hook
3 small half pearl shanked buttons
Gauge: Rows 1 - 3 in patt = 5 3/4” x 1"
2 rows of 3 Stacked Arches = 1 3/4" x 3/4"
Stitch Patterns
Oval Windows: instructions given in pattern below
Tr3tog: *Yo twice, insert hook in next st and draw up a loop, (yo and draw through 2 loops) twice, rep from * two times, yo and draw through 4 loops.
Stacked Arches
After an intial setup row, the pattern is worked as follows:
Ch 1, *(4 sc, ch 5, 4 sc) in ch-5 loop, rep from * across, turn.
The cuff uses the lovely Oval Windows pattern, bordered at top and bottom by a row of single crochet stitches. The Stacked Arches pattern begins in row 7. Arches are added to shape the hand and thumb.
Special Stitches
Cluster (CL): tr3tog as follows -- 3 times (4 loops on hook), yo and draw through all loops.
STITCHING TIPS:
1) Work the CL stitches, and all tr st loosely, so that stitches are tall.
2) To avoid a large loop when skipping several stitches, as in Row 2, bring the work close to where you insert hook after skipped stitches.
NOTE: Helen Stohlman has worked out a method for doing these gloves in the round with no seam. We are very grateful to her for sharing it with us. See the note at the very end of the pattern if you want to try that version.
Left Hand
Ch 43.
Row 1: Sc in 2nd ch from hook and in each chain across, turn. 42 sc.
Row 2: Ch 5 (counts as dc and ch 2) *sk 6 sc, in next sc work (3 tr, ch 2, tr, ch 2, 3 tr), ch 2, sk 6 sc, dc in next sc, ch 2, rep from * across, ending last rep with dc in last sc, turn.
Row 3: Ch 4 (counts as tr), *tr3tog over next 3 tr, ch 5, dc in nex tr, ch 5, tr3tog over next 3 tr, tr in next dc, rep from *across, ending last rep with tr in 3rd ch of tch, turn.
Row 4: Ch 6 (counts as tr and ch 2), *3 tr in CL, ch 2, dc in dc, ch 2, 3 tr in CL, ch 2, tr in tr, ch 2, rep from * across, ending last rep with 3 tr in last CL, ch 2, tr in tch, turn.
Row 5: Ch 8 (counts as dc and ch 5), *CL over next 3 tr, tr in dc, CL over next 3 tr, ch 5, dc in next tr, ch 5, rep from * across, ending last rep with dc in 4th ch of tch, turn.
Row 6: Ch 1, sk dc *5 sc in ch-5 loop, sc in CL, sc in tr, sc in CL, 5 sc in ch-5 loop, sc in dc, rep from * across, with last rep ending with 5 sc in last ch-5 loop, turn. (41 sc).
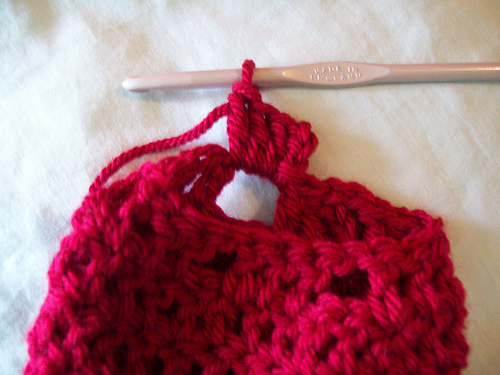
Begin Stacked Arches
Row 7: *Ch 5, sk 3 sc, sc in next sc, rep from * across , turn.
(10 ch-5 loops)
Row 8: Ch 1, *(4 sc, ch 5, 4 sc) in ch-5 loop, rep from * across, turn. ( 10 arches)
Row 9: Ch 2, *(4 sc, ch 5, 4 sc) in ch-5 loop, rep from * across, turn.
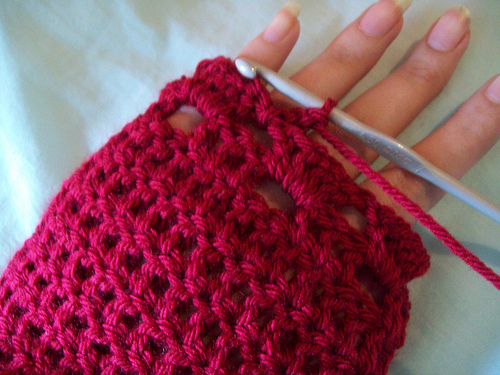
Palm Shaping
Row 10: Ch 2, work Stacked Arches patt in first 5 ch-5 loops, over next join between 2 arches work (3 dc, ch 5, 3 dc), cont in Stacked Arches patt to end.
Row 11: Ch 2, work Stacked Arches in ea ch-5 loop across. (11 arches)
Row 12: Ch 2, work Stacked Arch in first ch-5 loop, in next ch-5 loop work (4 sc, ch 5, 4 sc, ch-5, 4 sc), cont working Stacked Arches all remaining 9 ch-5 loops. (12 ch-5 loops).
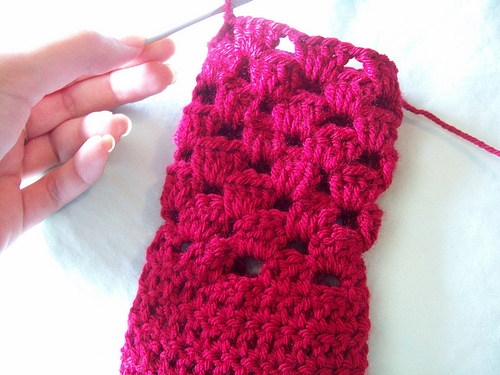
Thumbhole
Row 13: Ch 2, work SA in first 8 ch-5 loops; (in next ch-5 loop work 9 sc) 2 times. Turn, ch 9, sk last 2 Arches just made, sl st in join between next 2 arches, ch 1, turn. In ch-9 loop work (4 sc, ch 5, 4 sc, ch-5, 4 sc). Now continue working SA in remaining ch-5 loops to end. 12 arches
NOTE: You now have a hole for the thumb, topped by two arches which are “finished off” -- the ones with 9 sc in them. In the following row you will work into the ch-5 loops made in the ch-9 loop.
Rows 14 and 15: Ch 2, work SA patt across.
Row 16: Ch 2, work 9 sc in ea ch-5 loop across.
Turn work 90 degrees. You will see that the first row has 4 sc along the side edge, while the next has a ch 2, and these two alternate all along the side. *Sk first sc, work sc into each of next 3 sc, work 3 sc in ch 2 toop, rep from * till you reach the end of Stacked Arches section, to Row 6 of pattern. We will now work the remaining section of the edge, adding in buttons as we go.
On working yarn, measure out about 3 feet of yarn and cut.
Before we proceed, now is the time to steam your pieces flat. The glove may look small, but it will stretch around the hand and fit snugly. My hands are large, and the gloves fit very nicely. If you are using a different yarn, test it for stretchiness. If it doesn’t stretch, you may also steam block the pieces to gain some fabric. After steaming, proceed to the next step.
Picking up the working yarn, work sc into side of row 6. Slide a button onto yarn and up to work. Work sc around other side of button shank into ch-3 at side of row 5. Work two more sc into this ch-3, 4 sc into side of tr (row 4). Slide up another button and work sc into side of row 4 st at bottom. Work 3 sc around dc at side of row 3, 2 sc around tch of row 2, slide up another button, work sc into side of row 1, end off.
Tie on at opposite side of glove at bottom (side of row 1). Ch 1, sc in side of row 1, ch 3 (this is a loop for button), 3 sc in dc at side of row 2, 4 sc around tch at side of row 3, ch 3 (2nd button loop), 4 sc into side of row 4, 3 sc around dc at side of row 5, ch 3 (3rd button loop); sc into side of row 6. Continuing up side of SA section, *work sc into side of each of next 3 sc, sk next sc, 3 sc around next ch-2 loop, rep from * to top, for a total of 24 sc on SA section. Note that you have been working with WS facing. Remove hook from loop and fold glove to bring two sides together.
Working from WS, make slip stitch seam to join glove at center. When done, turn inside out.
Right Hand
Follow instructions for Left Hand up to and including row 11.
Thumb Shaping
Row 12: Ch 1, worked Stacked Arches patt 9 times, in next ch-5 loop work (4 sc, ch 5, 4 sc, ch-5, 4 sc), work Stacked Arches patt in last ch-5 loop, turn. (12 ch-5 loops).
Row 13: Ch 2, work SA in first 2 ch-5 loops, (in next ch-5 loop work 9 sc) 2 times. Turn, ch 9, sk last 2 Arches just made, sl st in join between next 2 arches, turn. Ch 1. In ch-9 loop work (4 sc, ch 5, 4 sc, ch-5, 4 sc). Now continue working SA in remaining ch-5 loops to end. 12 arches
For rest of glove, follow instructions for Left Hand beginning at Row 14 to end.
IN THE ROUND VERSION:
Follow directions as written but beginning in row 8 work as follows:
Row 8: work as directed but do not turn..
Row 9: sl st in each of the 4 sc in the first arch of row 8; continue in pattern (work 4sc, ch 5, 4 sc in each loop).
Continue working in the round, beginning each round with sl st in the first 4 sc of the first arch in the previous row.


The Fingerless Gloves Fanatics group on Ravelry is having a monthly KAL/CAL featuring new patterns by group members & I was lucky enough to get the February crochet slot. This pattern was created especially for the CAL & will be available free here during the month of February (& possibly for longer).
I hope you have fun making these mitts & that you come back in June when my turn rolls around again :0)
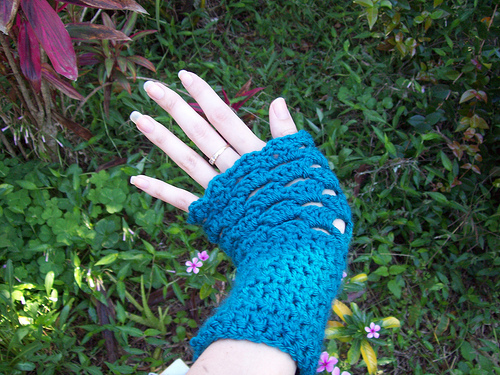
Harlequin Mitts by Shirley MacDonald
Size: Ladies medium
1 50g ball of DK yarn in main colour (MC) - I used Patons Diploma Gold DK in red
1 50g ball DK yarn in contrast colour (CC) - I used Rowan Pure Wool DK in enamel
4mm hook*
4.5mm hook*
1 stitch marker
*Please note - I crochet tight so if you generally crochet quite loosely you may wish to use 3.5mm & 4mm instead.
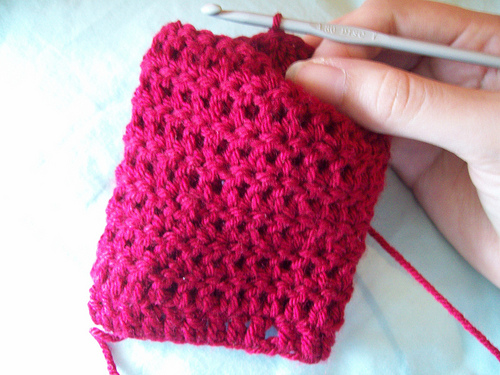
These mitts use a very simple & easy to memorise 4-row pattern with 2 rows worked in each colour. The colours are not fastened off between rounds but are carried up the inside of the work - be sure to pull your new yarn tight (but not too tight!) at each colour change. Once finished the inside of the glove should look like this -
The stitch count remains the same throughout & shaping is achieved by changing hook sizes.
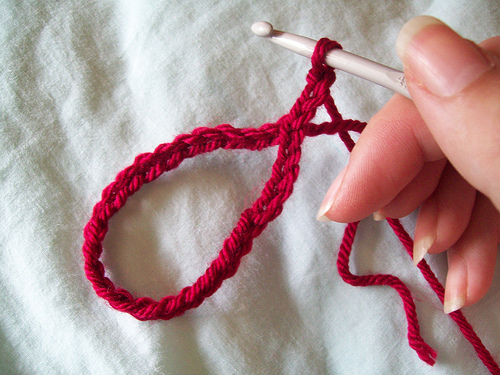
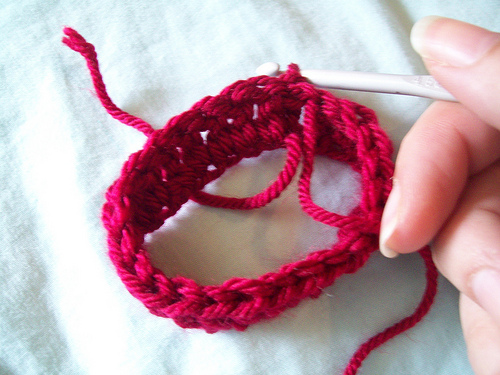
They begin with a double crochet foundation chain. This gives a nice stretchy foundation row. If preferred you can just start with a normal foundation chain & work a single row of double crochet first but this will be much less stretchy.
Please note that pattern uses US terminology.
Abbreviations:
ch - chain
DC - double crochet
sl st - slip stitch
FPDC - front post double crochet
BPDC - back post double crochet
Techniques:
Double crochet foundation chain -
Make a slip knot & chain 3 (counts as first stitch).
Step 1 - Yarn around hook, insert hook into ch furthest from hook & work 1 DC.
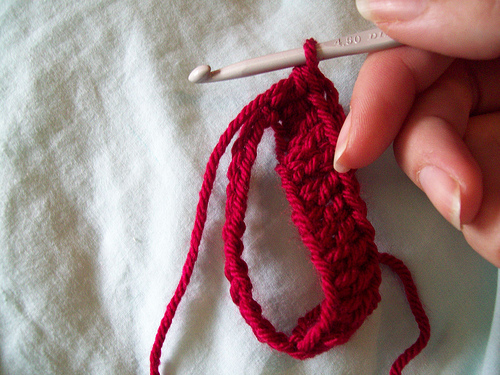
Step 2 - Yarn around hook, insert hook into bottom loop of first double crochet & work 1 DC.
Repeat step 2 until you have worked the required number of stitches.
Front post double crochet (FPDC) - yarn around hook, insert hook from front to back around the stem of the next stitch, yarn around hook & draw loop through, yarn around hook & draw through 2 loops, tarn around hook & draw through remaining 2 loops.
Back post double crochet (BPDC) - yarn around hook, insert hook from back to front around the stem of the next stitch, yarn around hook & draw loop through, yarn around hook & draw through 2 loops, yarn around hook & draw through remaining 2 loops.
First mitt (both mitts alike):
Using 4mm hook, main colour (MC) & double crochet foundation chain method make 36 stitches. Join with a slip stitch around the stem of the first stitch (beginning 3 chain), inserting hook from back to front between first & second stitches.
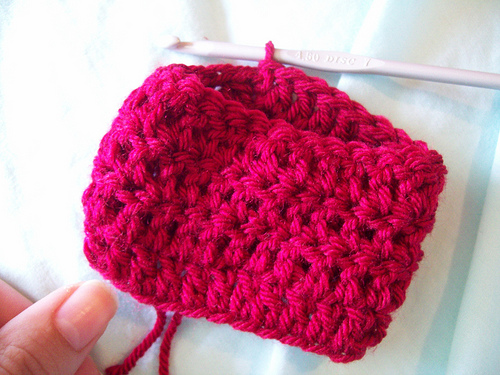
Rows 1-5 - Chain 3 (counts as first stitch), BPDC around next stitch, to end of round. Join with a slip stitch around the stem of the first stitch, inserting hook from back to front between first & second stitches.
Row 6 - 5 times, 3 ch, skip next 2 stitches, 1 DC into next stitch, 3 ch, skip 2 stitches, slip stitch into 1st of 3ch at beginning of round. Drop MC but do not break yarn.
Row 7 - Using contrast colour (CC), 4 ch (counts as 1 DC & 1 ch), 1 DC into first sl st, skip 3ch, sl st into next DC, 5 times, 1DC into base of 4ch, ch 1, slip into 3rd ch of beginning 4ch.
Row 8 - Using CC, ch 6 (counts as 1 DC & 3ch), skip {1ch & 1DC}, sl st into next sl st, 5 times, 3ch, sl st into the 3rd of beginning 6ch. Drop CC but do not break yarn.
Row 9 - Using MC, ch1, skip 3ch, 6 times, working sl st of final repeat into the ch1 at beginning of round.
Row 10 - Using MC, 6 times working sl st of final repeat into base of beginning ch3. Drop MC & pick up CC.
Rows 7-10 form the pattern.
Change to 4.5mm hook
Rows 11-14 - repeat rows 7-10
Rows 15 - 16 - repeat rows 7 - 8
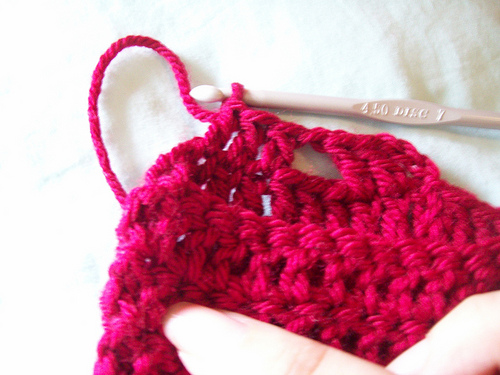
Make thumb hole
Row 17 - Using MC, ch1, skip 3ch, 2 times, place marker in sl st just worked, ch11, skip next , sl st into next DC, 2 times, working sl st of final repeat into the ch1 at beginning of round.
Row 18 - Using MC, 2 times, ch3, skip 2ch, 1DC in next ch, ch3, skip 2ch, sl st in next chain, ch3, skip 2ch, 1DC in next ch, ch3, skip 2ch, sl st into next sl st, 2 times working sl st of final repeat into base of beginning ch3.
Rows 19 - 22 - repeat rows 7 - 10.
Rows 23 - 25 - repeat rows 7 - 9.
Row 26 - ch3 (counts as first st), work 1 DC in every DC, ch1 & sl st to end. Join with a slip stitch around the stem of the first stitch (beginning 3 chain), inserting hook from back to front between first & second stitches. 36 sts
Row 27 - ch3 (counts as 1st stitch), BPDC around next stitch, to end of round. Join with a slip stitch to top of ch3.
Fasten off & weave in ends.
Thumb
Using MC & 4mm hook, rejoin yarn to marked stitch on row 17.
Row 1 - Skip 3ch, twice.
Row 2 - Working along underside of 11ch twice. Now working along Row 1 twice.