المفاجئة التي اخبرتك بها اختي عبير المسك هي تلبة طلبك باذن الله لكن لسى بكير ان تشتغلي بالاسطر الدائرية ساضعهم هنا لحين الرجوع اليهم لاحقا
غير مطلوب في الدورةتطبيقهم هوطلب خاص من الاخت عبير المسك
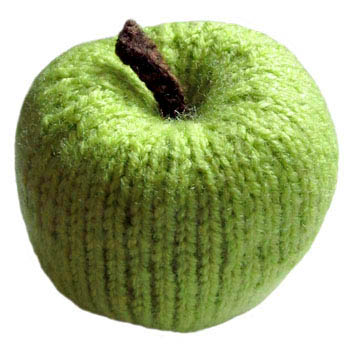
Apples (R2)
Our first step on the way to an ODDknit fruitbowl the knitted apple is now ready.
A printable version of this pattern is available.
You will need:
- red/green and brown double knit
- toy stuffing
- 4 x double ended needles (3mm)
- tapestry needle
- scissors
(A list of abbreviations is available.)
Apple
Cast on 6 sts in green or red. Join the stitches into the round.
Rounds 1-3: k –
Round 4: x 3 (9)
Round 5: x 3 (12)
Round 6: k –
Round 7: kfb x 12 (24)
Round 8: k –
Round 9: kfb x 24 (48)
Knit the next 24 rounds straight.
Round 34: x 6 (42)
Round 35: x 6 (36)
Round 36: k –
Round 37: x 6 (30)
Round 38: x 6 (24)
Round 39: k –
Round 40: x 6 (18)
Round 41: x 6 (12)
Round 42 & 43: k –
Stuff the apple through the opening. Cut the yarn, leaving a tail, thread through remaining stitches and pull tight.
Stalk
- Using brown yarn cast on 3 stitches.
- **** 6 rows i-cord.
- Cast of in a straight line.
Sew the tail of yarn back and forth between the cast off point and the cast off point and the cast on point, pulling them towards each other so that a dimple forms at the top and bottom of the apple.
Attach the stalk to the top of the apple and sew in any remaining loose ends.
Notes:
Needle/Yarn Size
As with most ODDknit patterns the yarn and needle sizes in the "you will need" section are just a guide. Feel free to improvise with whatever needles and yarn you have lying around - that's half the fun!
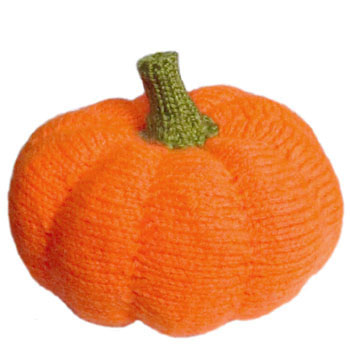
Pumpkin (R3)
Small for a pumpkin, but big for an ODDknit. Most of the design is knitted in the flat, but the stem is done in the round.
A printable version of this pattern is available.
You will need:
- orange and green double knit
- toy stuffing
- 4 x double ended needles (3mm)
- tapestry needle
- scissors
(A list of abbreviations is available.)
Pumpkin
Cast on 24 in a contrasting colour then switch to orange. Leave a long tail of your main colour for sewing up later. **** in the flat, as follows:
Round 1: k –
Round 2: p –
Round 3: x 8 (40)
Round 4: p34 w&t/ k28 w&t/ p22 w&t/ k16 w&t/ p – (40)
Round 5: k –
Round 6: p28 w&t/ k16 w&t/ p22 w&t/ k28 w&t/ p – (40)
Round 7: k –
Round 8: x 8 (24)
Repeat rows 1 to 8 nine more times so that there are ten repeats in total. Leave the stitches on the needle for making up.
Stem
Cast on 20sts in green and join into the round.
Rounds 1-3: k –
Round 4: x 5 (15)
Round 5: k –
Round 6: x 5 (10)
Knit the next 8 rounds straight.
Round 15: p –
Round 16: k –
Round 17: k2tog x 5 (5)
Thread yarn through remaining stitches and pull tight.
Making Up:
Carefully unpick the cast on edge of the orange pumpkin body. As you unwind the contrasting yarn orange stitches become “live” and in danger of unravelling. As you free up each stitch slip it onto a double ended needle. You should finish with 24 stitches on this needle to match the 24 stitches on the needle at the other end of the knitting.
We are now going to use Kitchener stitch to graft the edges of the pumpkin together.
Thread the long tail of yarn from the cast on edge onto a tapestry needle. Hold the two knitting needles together so that the wrong side of the knitting is on the interior.
Insert the tapestry needle p-wise into the first stitch on the front needle then k-wise into the first stitch on the back needle.
The next four steps form the Kitchener stitch. Repeat until all stitches have been grafted together (you will need to stop half way through to transfer the remainder of the stitches from the stitch keepers onto the knitting needles).
Insert the tapestry needle:
k-wise into the first stitch on the front needle.
Slip this stitch off the needle.
p-wise into next stitch on front needle.
Leave this stitch on the needle.
p-wise into the first stitch on the back needle
Slip this stitch off the needle.
k-wise into the next stitch on the back needle
Leave this stitch on the needle.
Emphasize the bulges in the pumpkin body by folding the end of each knitted section into a peak and then running a thread through them. Do this at both ends of the pumpkin body.
At the base of the pumpkin pull the thread tight to gather the sections together. Sew back and forth over the remaining hole to close the opening completely.
Stuff the pumpkin body through the hole at the top then pull the thread to gather the ends of the sections together. Leave a hole about 2cm across and then fix the thread in place.
Stuff the knitted stem. Fix the stuffing in place by sewing loosely back and forth across the stem. Sew the base of the stem to the remaining hole in the pumpkin top.
Lose any remaining loose ends inside the pumpkin.
Notes:
Needle/Yarn Size
As with most ODDknit patterns the yarn and needle sizes in the "you will need" section are just a guide. Feel free to improvise with whatever needles and yarn you have lying around - that's half the fun!


شرح الغرزة
To begin, **** two rows in this pattern so you can form the cable on the third row:
لبداية هذا العمل اشتغلي 2 اسطر مقلوب و في السطر الثالث اشتغلي غروة الضفيرة :
Row one: P3, K6, P3
السطر الاول 3مقلوب ضفيرة 3 مقلوب
Row two:K3, P6, K3
السطر الثاني 3 عدل 6 مقلوب 3 عدل
At the beginning of the third row, purl the first three stitches.
بداية السطر الثالث 3 غرز مقلوب
الضفيرة يسار :
نقره على هذا الشريط لعرض الصورة بالمقاس الحقيقي اضغطي هنا لمشاهدة الصورة بحجمها الأصلي
To get ready to form the cable, first knit those two rows:
للبداية بعمل هذه الغرزة اشتغلي 2 اسطر
Row one: P3, K6, P3
اول سطر 3 مقلوب 6 ضفيرة 3مقلوب
Row two: K3, P6, K3
السطر الثاني 3 عدل 6 مقلوب 3 عدل
هذا الرابط فيه اروع الغرز تريكو للضفائر و الاران بتمنى تستفيدوا منه لانني في الجزء الثاني تريكو لح اشرح منه الكثير من الغرز
http://newstitchaday.com/how-to-knit-the-bulky-cable/