شقراويية
•


+1
شقراويية
•
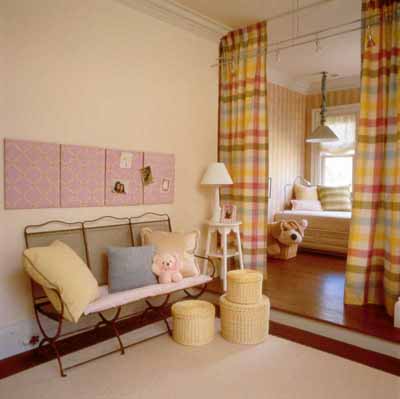
شوفوا لوحه لغرفة االطفل للعرض وحفظ صوره واعماله
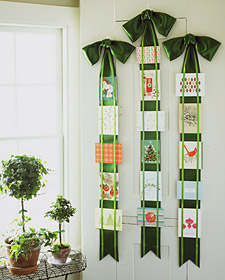
What You'll Needطريقة العمل باالإنجليزيّة
2 pieces of cork, each 16 inches square
16-inch square foam core
Craft glue
20-inch square quilt batting, 1/2 inch thick
20-inch square cotton fabric
Hot-temperature glue gun and glue sticks
6 yards satin or grosgrain ribbon, 1/2 inch wide
Scissors
Tape measure
15 to 18 matching buttons
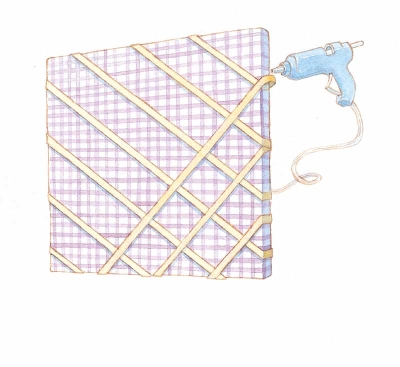
Matching thread and needle1. Use craft glue to attach cork piece to foam, and let dry. Glue second cork piece on top of first; let dry.
2. Place batting over board so 2 inches hangs over on each side. Hot glue batting edges to back of board, making sure it is straight and lies smooth. Put fabric over batting, and secure in same manner as batting.
3. Starting in bottom left corner, stretch piece of ribbon diagonally over board. Let last 2 inches of each ribbon wrap around back of board. Glue ends in place. Continue attaching ribbon, moving up board diagonally and spacing each ribbon 4 inches apart. When completed diagonally in 1 direction, attach ribbon in opposite diagonal direction to create a checkerboard effect.
4. Position button over intersection of 2 ribbons, and stitch in place. Repeat at all ribbon intersections.
What You'll Needطريقة العمل باالإنجليزيّة
2 pieces of cork, each 16 inches square
16-inch square foam core
Craft glue
20-inch square quilt batting, 1/2 inch thick
20-inch square cotton fabric
Hot-temperature glue gun and glue sticks
6 yards satin or grosgrain ribbon, 1/2 inch wide
Scissors
Tape measure
15 to 18 matching buttons
Matching thread and needle1. Use craft glue to attach cork piece to foam, and let dry. Glue second cork piece on top of first; let dry.
2. Place batting over board so 2 inches hangs over on each side. Hot glue batting edges to back of board, making sure it is straight and lies smooth. Put fabric over batting, and secure in same manner as batting.
3. Starting in bottom left corner, stretch piece of ribbon diagonally over board. Let last 2 inches of each ribbon wrap around back of board. Glue ends in place. Continue attaching ribbon, moving up board diagonally and spacing each ribbon 4 inches apart. When completed diagonally in 1 direction, attach ribbon in opposite diagonal direction to create a checkerboard effect.
4. Position button over intersection of 2 ribbons, and stitch in place. Repeat at all ribbon intersections.

الصفحة الأخيرة