
كويتيه^فراوله
•
البترون موجود تحت صورة الشال بالصفحات السابقه
اشكرك علي اهتمامك ياشمس
يارب هات لنا راجيه بالسلامه
ويكون المانع خير
ازيك يافراوله اعلم حبيبتي انه يوجد بترون للشال
ولكن لا اعرف من الباترون انا حبيت شرح الراجيه خالص
اشكرك
يارب هات لنا راجيه بالسلامه
ويكون المانع خير
ازيك يافراوله اعلم حبيبتي انه يوجد بترون للشال
ولكن لا اعرف من الباترون انا حبيت شرح الراجيه خالص
اشكرك
assmaa :
weana kaman badom soty lloket nasim walakom azem alshoker:26:weana kaman badom soty lloket nasim walakom azem alshoker:26:
بنات اليكم بعض البونشوات :)
Ribbon Poncho
Lion Brand® Incredible
GAUGE:
8 double crochet + 6 rows = 4 inches .
BE SURE TO CHECK YOUR GAUGE.
PONCHO
Chain 34.
Row 1 1 double crochet in 3rd chain from hook and in each chain across – 31 double crochet. Chain 3, turn.
Row 2 Skip first double crochet, 1 double crochet in each double crochet and in turning chain. Chain 3 turn.
Repeat Row 2 until piece measures 55 inches. Fasten off. Weave in ends.
FINISHING
Fold piece in half widthwise (16 inches x 27½ inches). Sew 16 inches seam along top of one long side of piece, from end toward fold, leaving remainder of edge open to form neck opening of Poncho.
Fringe
(Note Fringes on this Poncho are in 3 small groups and are at uneven lengths.)
Neck Fringe
Cut 2 pieces of ribbon 24 inches long. Attach at inside end of 16 inches seam (neck opening), one at a time, by folding each piece in half and using crochet hook to draw through fabric to form a loop, then draw ends through loop and pull gently to snug up against surface of Poncho. Trim so strands measure between 9 inches and 12 inches.
Back Point Fringe
Cut 2 pieces of ribbon 24 inches. Attach at back point as for Neck Fringe. Trim so strands measure between 9 inches and 12 inches.
Left Side Fringe
Cut 2 pieces of ribbon 22 inches long. Attach on Left Front of Poncho, approximately 17 inches up left side from front point. Trim so that strands measure between 8 inches and 10 inches. Cut 2 more pieces 22 inches long and attach 1 inches above last 2 strands. Trim to between 8 inches and 10 inches.
Poncho in 4 Versions: Incredible Version
Lion Brand® Incredible
GAUGE:
(Dc, ch 1) 5 times + 5 rows = 4" in (dc, ch 1) pattern.
4 V-sts + 6 rows = 4" in V-st pattern. BE SURE TO CHECK YOUR GAUGE.
STITCH EXPLANATION:
V-st (Dc, ch 1, dc) in same st or space.
PONCHO
Foundation Rnd Starting at neck edge, ch 3, sc in 3rd ch from hook, *ch 3, sc in last ch3-space; repeat from * until Foundation Rnd measures 32" ; join with slip st in first ch3-space.
BODY
Rnd 1 (RS) Ch 4, work (dc, ch 1) 63 times evenly spaced around ring; join with slip st in 3rd ch of beg ch – 64 ch1-spaces.
Rnds 2-3 Slip st in first ch1-space, ch 4, (dc, ch 1) in each ch1-space around; join with slip st in 3rd ch of beg ch.
Rnd 4 Slip st in first ch1-space, ch 4, dc in same ch1-space, ch 1 (inc made), (dc, ch 1) in each of next 31 ch1-spaces, (dc, ch 1, dc, ch 1) in next ch1-space (inc made), (dc, ch 1) in each of next 31 ch1-spaces; join with slip st in 3rd ch of beg ch – 66 ch1-spaces.
Rnds 5-7 Repeat Rnd 2.
Rnd 8 Slip st in first ch1-space, ch 4, dc in same ch1-space, ch 1 (inc made), (dc, ch 1) in each of next 32 ch1-spaces, (dc, ch 1, dc, ch 1) in next ch1-space (inc made), (dc, ch 1) in each of next 32 ch1-spaces; join with slip st in 3rd ch of beg ch – 68 ch1-spaces.
Rnds 9-11 Repeat Rnd 2.
Rnd 12 Slip st in first ch1-space, ch 4, dc in same ch1-space, ch 1 (inc made), (dc, ch 1) in each of next 33 ch1-spaces, (dc, ch 1, dc, ch 1) in next ch1-space (inc made), (dc, ch 1) in each of next 33 ch1-spaces; join with slip st in 3rd ch of beg ch – 70 ch1-spaces.
DIVIDE FOR FRONT AND BACK
Note Work now progresses in rows.
FRONT
Row 1 (RS) Ch 3, (dc, ch 1) in each of next 34 ch1-spaces, dc in next space; turn, leaving remaining sts unworked – 34 ch1-spaces.
Row 2 Ch 3, (dc, ch 1) in each ch1-space across, dc in top of turning ch; turn.
Rows 3-14 Repeat Row 2.
Fasten off.
BACK
Row 1 With RS facing, join yarn in first ch1-space to the left of last st made in Row 1 of Front, ch 3, (dc, ch 1) in each of next 34 ch1-spaces, dc in next space; turn – 34 ch1-spaces.
Row 2 Ch 3, (dc, ch 1) in each ch1-space across, dc in top of turning ch; turn.
Rows 3-14 Repeat Row 2.
Fasten off.
COLLAR
Rnd 1 With RS facing, join yarn on opposite side of foundation rnd, ch 4, dc in same space, work 33 V-sts evenly spaced around foundation rnd; join with slip st in 3rd ch of beg ch – 34 V-sts.
Rnds 2-12 Slip st in ch1-space of first V-st, ch 4, dc in same ch1-space, V-st in ch1-space of each V-st around; join with slip st in 3rd ch of beg ch.
Fasten off.
FINISHING
Slit Trim
Row 1 With RS facing, join yarn at bottom corner of one slit, ch 1, sc evenly spaced up one side of slit, sc evenly spaced down other side of slit to bottom corner. Fasten off.
Repeat Slit Trim around other slit. Fasten off. Weave in ends.
Color Block Poncho
Lion Brand® Color Waves
GAUGE:
6.5 sc + 6.5 rows = 4" on larger hook.
6.5 sts + 4 rows = 4" in Body pattern on larger hook.
BE SURE TO CHECK YOUR GAUGE.
STITCH EXPLANATION:
V-stitch (dc, ch 1, dc) in same st or ch-space
BASIC PONCHO
BASIC YOKE
With MC and larger hook, loosely ch 36 (42, 42); join with slip st to form ring, being careful not to twist ch.
Rnd 1 (RS) Ch 1, sc in each ch around, working into the nub in the back of each ch. Place marker and continue in rounds.
Rnd 2 6 times – 42 (48, 48) sc.
Rnd 3 6 times – 48 (54, 54) sc.
Rnd 4 6 times – 54 (60, 60) sc.
Rnd 5 6 times – 60 (66, 66) sc.
Rnd 6 6 times – 66 (72, 72) sc.
Size L/XL only
Rnd 7 6 times – 78 sc.
All sizes
Slip st in beg of rnd. Fasten off.
BASIC BODY
With RS facing, skip sc at beg of rnd, skip next 17 (20, 23) sc, join MC in next sc.
Row 1 (RS) Ch 3, 14 (16, 17) times, V-stitch in next sc, 14 (15, 17) times, V-stitch in next sc, dc in next sc, turn – 30 (33, 36) V-stitches. Leave center 6 sc unworked.
Row 2 Ch 3, V-stitch in ch-space of each V, dc in top of t-ch, turn.
Repeat last row 12 more times for Striped Trim version; 15 more times for Color-block version; or to desired length. Fasten off.
BASIC FINISHING
BASIC BAND
With RS facing, join yarn in first unworked sc of Yoke.
Row 1 Ch 1, 2 sc in side of each dc row along left front, sc in side of last row; rotate to work across lower edge; work 3 sc in first dc for corner, sc in each dc and ch-space across, work 3 sc in last dc for corner; rotate to work up right front; sc in side of first dc row, 2 sc in side of each dc row, slip st in next 2 unworked sc of Yoke, turn.
Row 2 Skip slip sts, sc in each sc across, working 3 sc in center sc of each corner, slip st in next 2 unworked sc of Yoke, turn.
Row 3 Repeat Row 2, ending with slip st in last unworked sc of Yoke. Fasten off.
NECK EDGING (optional)
Join with slip st in any spare loop of neck. Ch 1, sc in each st around, join with slip st in beg sc – 36 (42, 42) sc. Fasten off.
Weave in ends.
CROCHET COLOR BLOCK PONCHO
YOKE
Work as for Basic Yoke using CC.
BODY
Rows 1-9 Work as for Basic Body using MC, repeating last row 7 times – 30 (33, 36) Vs.
Divide body for vents, working each section separately.
LEFT FRONT
Row 10 (RS) Ch 3, 5 (6, 7) times, dc in next dc of same V, turn.
Rows 11-15 Work even on 5 (6, 7) Vs.
Fasten off.
BACK
Row 10 (RS) Skip 6 sts (2 V-stitche) from Left Front, join in next dc, 16 (17, 18) times, dc in next dc of same V, turn.
Rows 11-15 Work even on 16 (17, 18) V-stitches.
Fasten off.
RIGHT FRONT
Row 10 Skip 6 sts (2 V-stitches) from Back, join in next dc, 5 (6, 7) times, dc in top of t-ch, turn.
Rows 11-15 Work even on 5 (6, 7) V-stitches.
Fasten off.
FINISHING
LEFT FRONT BAND
Rows 1-3 With CC, work as for Basic Band, except work from unworked sc of Yoke to unworked sts of side vent.
BACK BAND
Rows 1-3 With CC, work as for Basic Band, except work from unworked sts of side vent to side vent.
RIGHT BAND
Rows 1-3 With CC, work as for Basic Band, except work from unworked sts of side vent to unworked sc of Yoke.
Fasten off, leaving a few inches of tail. Use tails to whip st tog top 3 sc of Band at neck and top of vents. Weave in ends.
BUTTON – Make 3
Rnd 1 With CC and smaller hook, ch 2, 6 sc in 2nd ch from hook, place marker and continue in the round.
Rnd 2 2 sc in each sc – 12 sc.
Rnd 3 6 times, join with slip st to beg of rnd. Fasten off, leaving a long tail.
Cup Rnd 3 to back of Button, thread tail on large-eyed, blunt needle, and weave through 6 sc of last rnd. Pull up to gather sts, knot tail with beg tail to flatten Button. Coax into a flat round about 1½" in diameter.
Use tails to attach to Band at center front and at each side vent.
TASSEL
Wrap MC around 7 inches cardboard about 25 times. Cut a strand of MC 18 inches long and thread doubled onto large-eyed, blunt needle. Insert needle under all strands at upper edge of cardboard. Pull tightly and knot securely near strands. Cut yarn loops at lower edge of cardboard. Cut a strand of CC 12 inches long and wrap tightly around loops 1½" below top knot to form Tassel neck. Knot securely; thread ends onto needle and weave ends to center of Tassel. Trim Tassel ends evenly.
Ribbon Poncho
Lion Brand® Incredible
GAUGE:
8 double crochet + 6 rows = 4 inches .
BE SURE TO CHECK YOUR GAUGE.
PONCHO
Chain 34.
Row 1 1 double crochet in 3rd chain from hook and in each chain across – 31 double crochet. Chain 3, turn.
Row 2 Skip first double crochet, 1 double crochet in each double crochet and in turning chain. Chain 3 turn.
Repeat Row 2 until piece measures 55 inches. Fasten off. Weave in ends.
FINISHING
Fold piece in half widthwise (16 inches x 27½ inches). Sew 16 inches seam along top of one long side of piece, from end toward fold, leaving remainder of edge open to form neck opening of Poncho.
Fringe
(Note Fringes on this Poncho are in 3 small groups and are at uneven lengths.)
Neck Fringe
Cut 2 pieces of ribbon 24 inches long. Attach at inside end of 16 inches seam (neck opening), one at a time, by folding each piece in half and using crochet hook to draw through fabric to form a loop, then draw ends through loop and pull gently to snug up against surface of Poncho. Trim so strands measure between 9 inches and 12 inches.
Back Point Fringe
Cut 2 pieces of ribbon 24 inches. Attach at back point as for Neck Fringe. Trim so strands measure between 9 inches and 12 inches.
Left Side Fringe
Cut 2 pieces of ribbon 22 inches long. Attach on Left Front of Poncho, approximately 17 inches up left side from front point. Trim so that strands measure between 8 inches and 10 inches. Cut 2 more pieces 22 inches long and attach 1 inches above last 2 strands. Trim to between 8 inches and 10 inches.
Poncho in 4 Versions: Incredible Version
Lion Brand® Incredible
GAUGE:
(Dc, ch 1) 5 times + 5 rows = 4" in (dc, ch 1) pattern.
4 V-sts + 6 rows = 4" in V-st pattern. BE SURE TO CHECK YOUR GAUGE.
STITCH EXPLANATION:
V-st (Dc, ch 1, dc) in same st or space.
PONCHO
Foundation Rnd Starting at neck edge, ch 3, sc in 3rd ch from hook, *ch 3, sc in last ch3-space; repeat from * until Foundation Rnd measures 32" ; join with slip st in first ch3-space.
BODY
Rnd 1 (RS) Ch 4, work (dc, ch 1) 63 times evenly spaced around ring; join with slip st in 3rd ch of beg ch – 64 ch1-spaces.
Rnds 2-3 Slip st in first ch1-space, ch 4, (dc, ch 1) in each ch1-space around; join with slip st in 3rd ch of beg ch.
Rnd 4 Slip st in first ch1-space, ch 4, dc in same ch1-space, ch 1 (inc made), (dc, ch 1) in each of next 31 ch1-spaces, (dc, ch 1, dc, ch 1) in next ch1-space (inc made), (dc, ch 1) in each of next 31 ch1-spaces; join with slip st in 3rd ch of beg ch – 66 ch1-spaces.
Rnds 5-7 Repeat Rnd 2.
Rnd 8 Slip st in first ch1-space, ch 4, dc in same ch1-space, ch 1 (inc made), (dc, ch 1) in each of next 32 ch1-spaces, (dc, ch 1, dc, ch 1) in next ch1-space (inc made), (dc, ch 1) in each of next 32 ch1-spaces; join with slip st in 3rd ch of beg ch – 68 ch1-spaces.
Rnds 9-11 Repeat Rnd 2.
Rnd 12 Slip st in first ch1-space, ch 4, dc in same ch1-space, ch 1 (inc made), (dc, ch 1) in each of next 33 ch1-spaces, (dc, ch 1, dc, ch 1) in next ch1-space (inc made), (dc, ch 1) in each of next 33 ch1-spaces; join with slip st in 3rd ch of beg ch – 70 ch1-spaces.
DIVIDE FOR FRONT AND BACK
Note Work now progresses in rows.
FRONT
Row 1 (RS) Ch 3, (dc, ch 1) in each of next 34 ch1-spaces, dc in next space; turn, leaving remaining sts unworked – 34 ch1-spaces.
Row 2 Ch 3, (dc, ch 1) in each ch1-space across, dc in top of turning ch; turn.
Rows 3-14 Repeat Row 2.
Fasten off.
BACK
Row 1 With RS facing, join yarn in first ch1-space to the left of last st made in Row 1 of Front, ch 3, (dc, ch 1) in each of next 34 ch1-spaces, dc in next space; turn – 34 ch1-spaces.
Row 2 Ch 3, (dc, ch 1) in each ch1-space across, dc in top of turning ch; turn.
Rows 3-14 Repeat Row 2.
Fasten off.
COLLAR
Rnd 1 With RS facing, join yarn on opposite side of foundation rnd, ch 4, dc in same space, work 33 V-sts evenly spaced around foundation rnd; join with slip st in 3rd ch of beg ch – 34 V-sts.
Rnds 2-12 Slip st in ch1-space of first V-st, ch 4, dc in same ch1-space, V-st in ch1-space of each V-st around; join with slip st in 3rd ch of beg ch.
Fasten off.
FINISHING
Slit Trim
Row 1 With RS facing, join yarn at bottom corner of one slit, ch 1, sc evenly spaced up one side of slit, sc evenly spaced down other side of slit to bottom corner. Fasten off.
Repeat Slit Trim around other slit. Fasten off. Weave in ends.
Color Block Poncho
Lion Brand® Color Waves
GAUGE:
6.5 sc + 6.5 rows = 4" on larger hook.
6.5 sts + 4 rows = 4" in Body pattern on larger hook.
BE SURE TO CHECK YOUR GAUGE.
STITCH EXPLANATION:
V-stitch (dc, ch 1, dc) in same st or ch-space
BASIC PONCHO
BASIC YOKE
With MC and larger hook, loosely ch 36 (42, 42); join with slip st to form ring, being careful not to twist ch.
Rnd 1 (RS) Ch 1, sc in each ch around, working into the nub in the back of each ch. Place marker and continue in rounds.
Rnd 2 6 times – 42 (48, 48) sc.
Rnd 3 6 times – 48 (54, 54) sc.
Rnd 4 6 times – 54 (60, 60) sc.
Rnd 5 6 times – 60 (66, 66) sc.
Rnd 6 6 times – 66 (72, 72) sc.
Size L/XL only
Rnd 7 6 times – 78 sc.
All sizes
Slip st in beg of rnd. Fasten off.
BASIC BODY
With RS facing, skip sc at beg of rnd, skip next 17 (20, 23) sc, join MC in next sc.
Row 1 (RS) Ch 3, 14 (16, 17) times, V-stitch in next sc, 14 (15, 17) times, V-stitch in next sc, dc in next sc, turn – 30 (33, 36) V-stitches. Leave center 6 sc unworked.
Row 2 Ch 3, V-stitch in ch-space of each V, dc in top of t-ch, turn.
Repeat last row 12 more times for Striped Trim version; 15 more times for Color-block version; or to desired length. Fasten off.
BASIC FINISHING
BASIC BAND
With RS facing, join yarn in first unworked sc of Yoke.
Row 1 Ch 1, 2 sc in side of each dc row along left front, sc in side of last row; rotate to work across lower edge; work 3 sc in first dc for corner, sc in each dc and ch-space across, work 3 sc in last dc for corner; rotate to work up right front; sc in side of first dc row, 2 sc in side of each dc row, slip st in next 2 unworked sc of Yoke, turn.
Row 2 Skip slip sts, sc in each sc across, working 3 sc in center sc of each corner, slip st in next 2 unworked sc of Yoke, turn.
Row 3 Repeat Row 2, ending with slip st in last unworked sc of Yoke. Fasten off.
NECK EDGING (optional)
Join with slip st in any spare loop of neck. Ch 1, sc in each st around, join with slip st in beg sc – 36 (42, 42) sc. Fasten off.
Weave in ends.
CROCHET COLOR BLOCK PONCHO
YOKE
Work as for Basic Yoke using CC.
BODY
Rows 1-9 Work as for Basic Body using MC, repeating last row 7 times – 30 (33, 36) Vs.
Divide body for vents, working each section separately.
LEFT FRONT
Row 10 (RS) Ch 3, 5 (6, 7) times, dc in next dc of same V, turn.
Rows 11-15 Work even on 5 (6, 7) Vs.
Fasten off.
BACK
Row 10 (RS) Skip 6 sts (2 V-stitche) from Left Front, join in next dc, 16 (17, 18) times, dc in next dc of same V, turn.
Rows 11-15 Work even on 16 (17, 18) V-stitches.
Fasten off.
RIGHT FRONT
Row 10 Skip 6 sts (2 V-stitches) from Back, join in next dc, 5 (6, 7) times, dc in top of t-ch, turn.
Rows 11-15 Work even on 5 (6, 7) V-stitches.
Fasten off.
FINISHING
LEFT FRONT BAND
Rows 1-3 With CC, work as for Basic Band, except work from unworked sc of Yoke to unworked sts of side vent.
BACK BAND
Rows 1-3 With CC, work as for Basic Band, except work from unworked sts of side vent to side vent.
RIGHT BAND
Rows 1-3 With CC, work as for Basic Band, except work from unworked sts of side vent to unworked sc of Yoke.
Fasten off, leaving a few inches of tail. Use tails to whip st tog top 3 sc of Band at neck and top of vents. Weave in ends.
BUTTON – Make 3
Rnd 1 With CC and smaller hook, ch 2, 6 sc in 2nd ch from hook, place marker and continue in the round.
Rnd 2 2 sc in each sc – 12 sc.
Rnd 3 6 times, join with slip st to beg of rnd. Fasten off, leaving a long tail.
Cup Rnd 3 to back of Button, thread tail on large-eyed, blunt needle, and weave through 6 sc of last rnd. Pull up to gather sts, knot tail with beg tail to flatten Button. Coax into a flat round about 1½" in diameter.
Use tails to attach to Band at center front and at each side vent.
TASSEL
Wrap MC around 7 inches cardboard about 25 times. Cut a strand of MC 18 inches long and thread doubled onto large-eyed, blunt needle. Insert needle under all strands at upper edge of cardboard. Pull tightly and knot securely near strands. Cut yarn loops at lower edge of cardboard. Cut a strand of CC 12 inches long and wrap tightly around loops 1½" below top knot to form Tassel neck. Knot securely; thread ends onto needle and weave ends to center of Tassel. Trim Tassel ends evenly.
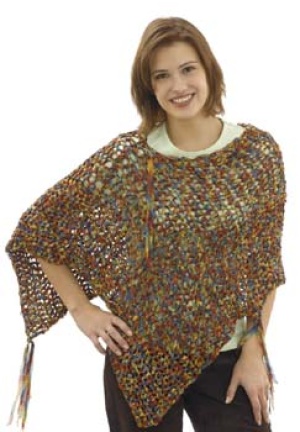
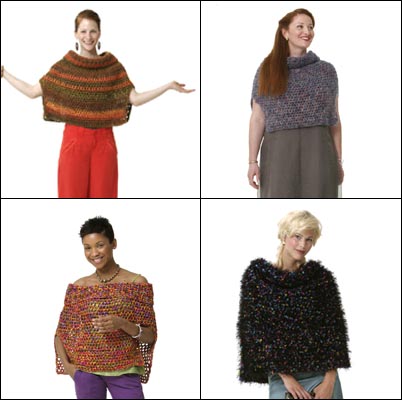
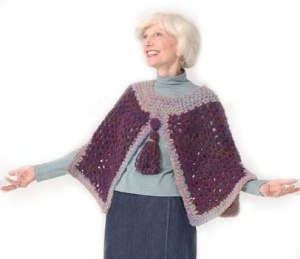
بنات اليكم بعض البونشوات :) Ribbon Poncho Lion Brand® Incredible GAUGE: 8 double crochet + 6 rows = 4 inches [10 cm]. BE SURE TO CHECK YOUR GAUGE. PONCHO Chain 34. Row 1 1 double crochet in 3rd chain from hook and in each chain across – 31 double crochet. Chain 3, turn. Row 2 Skip first double crochet, 1 double crochet in each double crochet and in turning chain. Chain 3 turn. Repeat Row 2 until piece measures 55 inches. Fasten off. Weave in ends. FINISHING Fold piece in half widthwise (16 inches x 27½ inches). Sew 16 inches seam along top of one long side of piece, from end toward fold, leaving remainder of edge open to form neck opening of Poncho. Fringe (Note Fringes on this Poncho are in 3 small groups and are at uneven lengths.) Neck Fringe Cut 2 pieces of ribbon 24 inches long. Attach at inside end of 16 inches seam (neck opening), one at a time, by folding each piece in half and using crochet hook to draw through fabric to form a loop, then draw ends through loop and pull gently to snug up against surface of Poncho. Trim so strands measure between 9 inches and 12 inches. Back Point Fringe Cut 2 pieces of ribbon 24 inches. Attach at back point as for Neck Fringe. Trim so strands measure between 9 inches and 12 inches. Left Side Fringe Cut 2 pieces of ribbon 22 inches long. Attach on Left Front of Poncho, approximately 17 inches up left side from front point. Trim so that strands measure between 8 inches and 10 inches. Cut 2 more pieces 22 inches long and attach 1 inches above last 2 strands. Trim to between 8 inches and 10 inches. Poncho in 4 Versions: Incredible Version Lion Brand® Incredible GAUGE: (Dc, ch 1) 5 times + 5 rows = 4" [10 cm] in (dc, ch 1) pattern. 4 V-sts + 6 rows = 4" [10 cm] in V-st pattern. BE SURE TO CHECK YOUR GAUGE. STITCH EXPLANATION: V-st (Dc, ch 1, dc) in same st or space. PONCHO Foundation Rnd Starting at neck edge, ch 3, sc in 3rd ch from hook, *ch 3, sc in last ch3-space; repeat from * until Foundation Rnd measures 32" [81.5 cm]; join with slip st in first ch3-space. BODY Rnd 1 (RS) Ch 4, work (dc, ch 1) 63 times evenly spaced around ring; join with slip st in 3rd ch of beg ch – 64 ch1-spaces. Rnds 2-3 Slip st in first ch1-space, ch 4, (dc, ch 1) in each ch1-space around; join with slip st in 3rd ch of beg ch. Rnd 4 Slip st in first ch1-space, ch 4, dc in same ch1-space, ch 1 (inc made), (dc, ch 1) in each of next 31 ch1-spaces, (dc, ch 1, dc, ch 1) in next ch1-space (inc made), (dc, ch 1) in each of next 31 ch1-spaces; join with slip st in 3rd ch of beg ch – 66 ch1-spaces. Rnds 5-7 Repeat Rnd 2. Rnd 8 Slip st in first ch1-space, ch 4, dc in same ch1-space, ch 1 (inc made), (dc, ch 1) in each of next 32 ch1-spaces, (dc, ch 1, dc, ch 1) in next ch1-space (inc made), (dc, ch 1) in each of next 32 ch1-spaces; join with slip st in 3rd ch of beg ch – 68 ch1-spaces. Rnds 9-11 Repeat Rnd 2. Rnd 12 Slip st in first ch1-space, ch 4, dc in same ch1-space, ch 1 (inc made), (dc, ch 1) in each of next 33 ch1-spaces, (dc, ch 1, dc, ch 1) in next ch1-space (inc made), (dc, ch 1) in each of next 33 ch1-spaces; join with slip st in 3rd ch of beg ch – 70 ch1-spaces. DIVIDE FOR FRONT AND BACK Note Work now progresses in rows. FRONT Row 1 (RS) Ch 3, (dc, ch 1) in each of next 34 ch1-spaces, dc in next space; turn, leaving remaining sts unworked – 34 ch1-spaces. Row 2 Ch 3, (dc, ch 1) in each ch1-space across, dc in top of turning ch; turn. Rows 3-14 Repeat Row 2. Fasten off. BACK Row 1 With RS facing, join yarn in first ch1-space to the left of last st made in Row 1 of Front, ch 3, (dc, ch 1) in each of next 34 ch1-spaces, dc in next space; turn – 34 ch1-spaces. Row 2 Ch 3, (dc, ch 1) in each ch1-space across, dc in top of turning ch; turn. Rows 3-14 Repeat Row 2. Fasten off. COLLAR Rnd 1 With RS facing, join yarn on opposite side of foundation rnd, ch 4, dc in same space, work 33 V-sts evenly spaced around foundation rnd; join with slip st in 3rd ch of beg ch – 34 V-sts. Rnds 2-12 Slip st in ch1-space of first V-st, ch 4, dc in same ch1-space, V-st in ch1-space of each V-st around; join with slip st in 3rd ch of beg ch. Fasten off. FINISHING Slit Trim Row 1 With RS facing, join yarn at bottom corner of one slit, ch 1, sc evenly spaced up one side of slit, sc evenly spaced down other side of slit to bottom corner. Fasten off. Repeat Slit Trim around other slit. Fasten off. Weave in ends. Color Block Poncho Lion Brand® Color Waves GAUGE: 6.5 sc + 6.5 rows = 4" [10 cm] on larger hook. 6.5 sts + 4 rows = 4" [10 cm] in Body pattern on larger hook. BE SURE TO CHECK YOUR GAUGE. STITCH EXPLANATION: V-stitch (dc, ch 1, dc) in same st or ch-space BASIC PONCHO BASIC YOKE With MC and larger hook, loosely ch 36 (42, 42); join with slip st to form ring, being careful not to twist ch. Rnd 1 (RS) Ch 1, sc in each ch around, working into the nub in the back of each ch. Place marker and continue in rounds. Rnd 2 [Sc in next 5 (6, 6) sc, 2 sc in next sc] 6 times – 42 (48, 48) sc. Rnd 3 [Sc in next 6 (7, 7) sc, 2 sc in next sc] 6 times – 48 (54, 54) sc. Rnd 4 [Sc in next 7 (8, 8) sc, 2 sc in next sc] 6 times – 54 (60, 60) sc. Rnd 5 [Sc in next 8 (9, 9) sc, 2 sc in next sc] 6 times – 60 (66, 66) sc. Rnd 6 [Sc in next 9 (10, 10) sc, 2 sc in next sc] 6 times – 66 (72, 72) sc. Size L/XL only Rnd 7 [Sc in next 11 sc, 2 sc in next sc] 6 times – 78 sc. All sizes Slip st in beg of rnd. Fasten off. BASIC BODY With RS facing, skip sc at beg of rnd, skip next 17 (20, 23) sc, join MC in next sc. Row 1 (RS) Ch 3, [V-stitch in next sc, skip next sc] 14 (16, 17) times, V-stitch in next sc, [V-stitch in next sc, skip next sc] 14 (15, 17) times, V-stitch in next sc, dc in next sc, turn – 30 (33, 36) V-stitches. Leave center 6 sc unworked. Row 2 Ch 3, V-stitch in ch-space of each V, dc in top of t-ch, turn. Repeat last row 12 more times for Striped Trim version; 15 more times for Color-block version; or to desired length. Fasten off. BASIC FINISHING BASIC BAND With RS facing, join yarn in first unworked sc of Yoke. Row 1 Ch 1, 2 sc in side of each dc row along left front, sc in side of last row; rotate to work across lower edge; work 3 sc in first dc for corner, sc in each dc and ch-space across, work 3 sc in last dc for corner; rotate to work up right front; sc in side of first dc row, 2 sc in side of each dc row, slip st in next 2 unworked sc of Yoke, turn. Row 2 Skip slip sts, sc in each sc across, working 3 sc in center sc of each corner, slip st in next 2 unworked sc of Yoke, turn. Row 3 Repeat Row 2, ending with slip st in last unworked sc of Yoke. Fasten off. NECK EDGING (optional) Join with slip st in any spare loop of neck. Ch 1, sc in each st around, join with slip st in beg sc – 36 (42, 42) sc. Fasten off. Weave in ends. CROCHET COLOR BLOCK PONCHO YOKE Work as for Basic Yoke using CC. BODY Rows 1-9 Work as for Basic Body using MC, repeating last row 7 times – 30 (33, 36) Vs. Divide body for vents, working each section separately. LEFT FRONT Row 10 (RS) Ch 3, [V-stitch in next ch-space] 5 (6, 7) times, dc in next dc of same V, turn. Rows 11-15 Work even on 5 (6, 7) Vs. Fasten off. BACK Row 10 (RS) Skip 6 sts (2 V-stitche) from Left Front, join in next dc, [V-stitch in next ch-space] 16 (17, 18) times, dc in next dc of same V, turn. Rows 11-15 Work even on 16 (17, 18) V-stitches. Fasten off. RIGHT FRONT Row 10 Skip 6 sts (2 V-stitches) from Back, join in next dc, [V-stitch in next ch-space] 5 (6, 7) times, dc in top of t-ch, turn. Rows 11-15 Work even on 5 (6, 7) V-stitches. Fasten off. FINISHING LEFT FRONT BAND Rows 1-3 With CC, work as for Basic Band, except work from unworked sc of Yoke to unworked sts of side vent. BACK BAND Rows 1-3 With CC, work as for Basic Band, except work from unworked sts of side vent to side vent. RIGHT BAND Rows 1-3 With CC, work as for Basic Band, except work from unworked sts of side vent to unworked sc of Yoke. Fasten off, leaving a few inches of tail. Use tails to whip st tog top 3 sc of Band at neck and top of vents. Weave in ends. BUTTON – Make 3 Rnd 1 With CC and smaller hook, ch 2, 6 sc in 2nd ch from hook, place marker and continue in the round. Rnd 2 2 sc in each sc – 12 sc. Rnd 3 [Sc2tog] 6 times, join with slip st to beg of rnd. Fasten off, leaving a long tail. Cup Rnd 3 to back of Button, thread tail on large-eyed, blunt needle, and weave through 6 sc of last rnd. Pull up to gather sts, knot tail with beg tail to flatten Button. Coax into a flat round about 1½" [4 cm] in diameter. Use tails to attach to Band at center front and at each side vent. TASSEL Wrap MC around 7 inches cardboard about 25 times. Cut a strand of MC 18 inches long and thread doubled onto large-eyed, blunt needle. Insert needle under all strands at upper edge of cardboard. Pull tightly and knot securely near strands. Cut yarn loops at lower edge of cardboard. Cut a strand of CC 12 inches long and wrap tightly around loops 1½" below top knot to form Tassel neck. Knot securely; thread ends onto needle and weave ends to center of Tassel. Trim Tassel ends evenly.بنات اليكم بعض البونشوات :) Ribbon Poncho Lion Brand® Incredible GAUGE: 8 double...
Martha Stewart 'Coming Home' Poncho
Lion Brand® Homespun®
GAUGE:
7 dc + 4 rows = 4" in pattern.
8 rows sc = 4" . BE SURE TO CHECK YOUR GAUGE.
STITCH EXPLANATION:
Block 3 dc in same st or space.
Shell (2 dc, ch 1, 2 dc) in same space.
PONCHO
Starting at neck edge, ch 44 loosely and join with slip st to form ring, being careful not to twist ch.
Rnd 1 (RS) Ch 3, 21 times, skip next ch, 2 dc in same ch as beg; join with slip st in top of beg ch – 22 Blocks.
Rnd 2 Slip st in space before next dc, ch 3, 2 dc in same space, 10 times, (3 dc, ch 1, 3 dc) in next space for corner, 10 times, 3 dc in same space as beg; join with sc in top of beg ch – 24 Blocks; 2 corners.
Rnd 3 Slip st in first space (working around post of last sc made), ch 3, 2 dc in same space, 11 times, (3 dc, ch 1, 3 dc) in ch1-space of corner, 11 times, 3 dc in same space as beg; join with sc in top of beg ch – 26 Blocks; 2 corners.
Rnds 4-20 Slip st in first space, ch 3, 2 dc in same space, across to next corner, (3 dc, ch 1, 3 dc) in ch1-space of corner, across to beg space, 3 dc in same space as beg; join with sc in top of beg ch – 60 Blocks; 2 corners at end of Rnd 20.
EDGING
Rnd 1 Slip st in first space, ch 3, dc in same space, *ch 3, skip next 2 dc, sc in next 5 dc, ch 3, skip next 2 dc, Shell in space between Blocks; repeat from * 18 more times, ch 3, skip next 2 dc, sc in next 5 dc, ch 3, skip next 2 dc, 2 dc in same space as beg; join with sc in top of beg ch – 20 Shells.
Rnd 2 Slip st in first space, (ch 3, dc, ch 1, 2 dc) in same space, *ch 3, skip next sc, sc in next 3 sc, ch 3, (Shell, ch 1, Shell) in next ch1-space; repeat from * 18 more times, ch 3, skip next sc, sc in next 3 sc, ch 3, Shell in same space as beg; join with sc in top of beg ch – 40 Shells.
Rnd 3 Slip st in first space, ch 3, dc in same space, Shell in next ch1-space, *ch 3, skip next sc, sc in next sc, ch 3, Shell in next 3 ch1-spaces; repeat from * 18 more times, ch 3, skip next sc, sc in next sc, ch 3, Shell in next ch1-space, 2 dc in same space as beg; join with sc in top of beg ch – 60 Shells.
Rnd 4 Slip st in first space, ch 3, dc in same space, Shell in next ch1-space, *ch 3, sc in next sc, ch 3, Shell in each of next 3 ch1-spaces; repeat from * 18 more times, ch 3, sc in next sc, ch 3, Shell in next ch1-space, 2 dc in same space as beg, ch 1; join with slip st in top of beg ch. Fasten off.
COLLAR
Rnd 1 With RS facing, working across opposite side of foundation ch on neck edge, join yarn in any ch on neck edge. Ch 1, sc in same ch, sc in each ch around; do not join; work in a spiral. Mark first sc and move marker up as work progresses – 44 sc.
Rnds 2-6 Sc in each sc around.
At end of Rnd 6, join with slip st in next sc. Fasten off.
Weave in ends.
FREQUENTLY ASKED QUESTIONS ABOUT THIS PATTERN
Q: In Rnd 3, where it says “Slip st in first space (working around post of last sc made) inches, what’s the post?
A: sc was worked to create the last "space" of the each round. Work around the body of the sc (instead of in the top 2 loops) as if it were a ch-1 space.
Q: Where is the other corner?
A: There are 2 "corners" made in each rnd. One is at the center front and one at the center back of the poncho. The one corner is (3 dc, ch 1, 3 dc) halfway through the rnd. The other corner is worked in 2 pieces. You do half of the first corner at the beginning of the rnd (ch 3, 2 dc in same space), then finish it at the end of the rnd (3 dc in same space as beg, sc in 3rd ch of turning ch to join). This produces a complete "corner".
Q: In the Edging instructions, Rnd 2 reads: “Slip st in first space, (ch 3, dc, ch 1, 2 dc) in same space, *ch 3, skip next sc, sc in next 3 sc, ch 3, (Shell, ch 1, Shell) in next ch1-space; repeat from * 18 more times, ch 3, skip next sc, sc in next 3 sc, ch 3, Shell in same space as beg; join with sc in top of beg ch – 40 Shells. inches but there is no sc in the previous rnd.
A: There are 5 sc between the shells in Rnd 1 of the Edging. See the underlined phrases:
Rnd 1 Sl st in first space, ch 3, dc in same space, * ch 3, skip next 2 dc, sc in next 5 dc, ch 3, skip next 2 dc, shell between next 2 blocks; rep from * 18 times, ch 3, skip next 2 dc, sc in next 5 dc, ch 3, skip next 2 dc, 2 dc in same space as beg, sc in 3rd ch of turning ch to join – 20 shells.
Q: In the Edging, Round 1, what is a shell?
A: Please see the Stitch Explanations section at the beginning of the pattern, where the definition is "Shell (2 dc, ch 1, 2 dc) in same space."
Q: In the Edging instructions, Rnd 2 asks you to work into the next ch 1 space but there is no ch 1 space in the previous rnd.
A: The ch 1 space is part of the shells worked in Rnd 1.
Lion Brand® Homespun®
GAUGE:
7 dc + 4 rows = 4" in pattern.
8 rows sc = 4" . BE SURE TO CHECK YOUR GAUGE.
STITCH EXPLANATION:
Block 3 dc in same st or space.
Shell (2 dc, ch 1, 2 dc) in same space.
PONCHO
Starting at neck edge, ch 44 loosely and join with slip st to form ring, being careful not to twist ch.
Rnd 1 (RS) Ch 3, 21 times, skip next ch, 2 dc in same ch as beg; join with slip st in top of beg ch – 22 Blocks.
Rnd 2 Slip st in space before next dc, ch 3, 2 dc in same space, 10 times, (3 dc, ch 1, 3 dc) in next space for corner, 10 times, 3 dc in same space as beg; join with sc in top of beg ch – 24 Blocks; 2 corners.
Rnd 3 Slip st in first space (working around post of last sc made), ch 3, 2 dc in same space, 11 times, (3 dc, ch 1, 3 dc) in ch1-space of corner, 11 times, 3 dc in same space as beg; join with sc in top of beg ch – 26 Blocks; 2 corners.
Rnds 4-20 Slip st in first space, ch 3, 2 dc in same space, across to next corner, (3 dc, ch 1, 3 dc) in ch1-space of corner, across to beg space, 3 dc in same space as beg; join with sc in top of beg ch – 60 Blocks; 2 corners at end of Rnd 20.
EDGING
Rnd 1 Slip st in first space, ch 3, dc in same space, *ch 3, skip next 2 dc, sc in next 5 dc, ch 3, skip next 2 dc, Shell in space between Blocks; repeat from * 18 more times, ch 3, skip next 2 dc, sc in next 5 dc, ch 3, skip next 2 dc, 2 dc in same space as beg; join with sc in top of beg ch – 20 Shells.
Rnd 2 Slip st in first space, (ch 3, dc, ch 1, 2 dc) in same space, *ch 3, skip next sc, sc in next 3 sc, ch 3, (Shell, ch 1, Shell) in next ch1-space; repeat from * 18 more times, ch 3, skip next sc, sc in next 3 sc, ch 3, Shell in same space as beg; join with sc in top of beg ch – 40 Shells.
Rnd 3 Slip st in first space, ch 3, dc in same space, Shell in next ch1-space, *ch 3, skip next sc, sc in next sc, ch 3, Shell in next 3 ch1-spaces; repeat from * 18 more times, ch 3, skip next sc, sc in next sc, ch 3, Shell in next ch1-space, 2 dc in same space as beg; join with sc in top of beg ch – 60 Shells.
Rnd 4 Slip st in first space, ch 3, dc in same space, Shell in next ch1-space, *ch 3, sc in next sc, ch 3, Shell in each of next 3 ch1-spaces; repeat from * 18 more times, ch 3, sc in next sc, ch 3, Shell in next ch1-space, 2 dc in same space as beg, ch 1; join with slip st in top of beg ch. Fasten off.
COLLAR
Rnd 1 With RS facing, working across opposite side of foundation ch on neck edge, join yarn in any ch on neck edge. Ch 1, sc in same ch, sc in each ch around; do not join; work in a spiral. Mark first sc and move marker up as work progresses – 44 sc.
Rnds 2-6 Sc in each sc around.
At end of Rnd 6, join with slip st in next sc. Fasten off.
Weave in ends.
FREQUENTLY ASKED QUESTIONS ABOUT THIS PATTERN
Q: In Rnd 3, where it says “Slip st in first space (working around post of last sc made) inches, what’s the post?
A: sc was worked to create the last "space" of the each round. Work around the body of the sc (instead of in the top 2 loops) as if it were a ch-1 space.
Q: Where is the other corner?
A: There are 2 "corners" made in each rnd. One is at the center front and one at the center back of the poncho. The one corner is (3 dc, ch 1, 3 dc) halfway through the rnd. The other corner is worked in 2 pieces. You do half of the first corner at the beginning of the rnd (ch 3, 2 dc in same space), then finish it at the end of the rnd (3 dc in same space as beg, sc in 3rd ch of turning ch to join). This produces a complete "corner".
Q: In the Edging instructions, Rnd 2 reads: “Slip st in first space, (ch 3, dc, ch 1, 2 dc) in same space, *ch 3, skip next sc, sc in next 3 sc, ch 3, (Shell, ch 1, Shell) in next ch1-space; repeat from * 18 more times, ch 3, skip next sc, sc in next 3 sc, ch 3, Shell in same space as beg; join with sc in top of beg ch – 40 Shells. inches but there is no sc in the previous rnd.
A: There are 5 sc between the shells in Rnd 1 of the Edging. See the underlined phrases:
Rnd 1 Sl st in first space, ch 3, dc in same space, * ch 3, skip next 2 dc, sc in next 5 dc, ch 3, skip next 2 dc, shell between next 2 blocks; rep from * 18 times, ch 3, skip next 2 dc, sc in next 5 dc, ch 3, skip next 2 dc, 2 dc in same space as beg, sc in 3rd ch of turning ch to join – 20 shells.
Q: In the Edging, Round 1, what is a shell?
A: Please see the Stitch Explanations section at the beginning of the pattern, where the definition is "Shell (2 dc, ch 1, 2 dc) in same space."
Q: In the Edging instructions, Rnd 2 asks you to work into the next ch 1 space but there is no ch 1 space in the previous rnd.
A: The ch 1 space is part of the shells worked in Rnd 1.
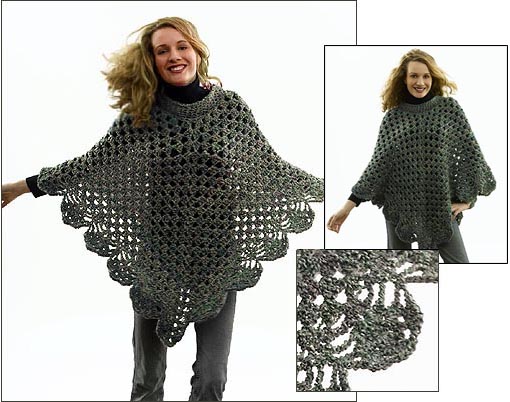
Martha Stewart 'Coming Home' Poncho Lion Brand® Homespun® GAUGE: 7 dc + 4 rows = 4" [10 cm] in pattern. 8 rows sc = 4" [10 cm]. BE SURE TO CHECK YOUR GAUGE. STITCH EXPLANATION: Block 3 dc in same st or space. Shell (2 dc, ch 1, 2 dc) in same space. PONCHO Starting at neck edge, ch 44 loosely and join with slip st to form ring, being careful not to twist ch. Rnd 1 (RS) Ch 3, [skip next ch, 3 dc in next ch] 21 times, skip next ch, 2 dc in same ch as beg; join with slip st in top of beg ch – 22 Blocks. Rnd 2 Slip st in space before next dc, ch 3, 2 dc in same space, [3 dc in space between next 2 Blocks] 10 times, (3 dc, ch 1, 3 dc) in next space for corner, [3 dc in space between next 2 Blocks] 10 times, 3 dc in same space as beg; join with sc in top of beg ch – 24 Blocks; 2 corners. Rnd 3 Slip st in first space (working around post of last sc made), ch 3, 2 dc in same space, [3 dc in space between next 2 Blocks] 11 times, (3 dc, ch 1, 3 dc) in ch1-space of corner, [3 dc in space between next 2 Blocks] 11 times, 3 dc in same space as beg; join with sc in top of beg ch – 26 Blocks; 2 corners. Rnds 4-20 Slip st in first space, ch 3, 2 dc in same space, [3 dc in space between next 2 Blocks] across to next corner, (3 dc, ch 1, 3 dc) in ch1-space of corner, [3 dc in space between next 2 Blocks] across to beg space, 3 dc in same space as beg; join with sc in top of beg ch – 60 Blocks; 2 corners at end of Rnd 20. EDGING Rnd 1 Slip st in first space, ch 3, dc in same space, *ch 3, skip next 2 dc, sc in next 5 dc, ch 3, skip next 2 dc, Shell in space between Blocks; repeat from * 18 more times, ch 3, skip next 2 dc, sc in next 5 dc, ch 3, skip next 2 dc, 2 dc in same space as beg; join with sc in top of beg ch – 20 Shells. Rnd 2 Slip st in first space, (ch 3, dc, ch 1, 2 dc) in same space, *ch 3, skip next sc, sc in next 3 sc, ch 3, (Shell, ch 1, Shell) in next ch1-space; repeat from * 18 more times, ch 3, skip next sc, sc in next 3 sc, ch 3, Shell in same space as beg; join with sc in top of beg ch – 40 Shells. Rnd 3 Slip st in first space, ch 3, dc in same space, Shell in next ch1-space, *ch 3, skip next sc, sc in next sc, ch 3, Shell in next 3 ch1-spaces; repeat from * 18 more times, ch 3, skip next sc, sc in next sc, ch 3, Shell in next ch1-space, 2 dc in same space as beg; join with sc in top of beg ch – 60 Shells. Rnd 4 Slip st in first space, ch 3, dc in same space, Shell in next ch1-space, *ch 3, sc in next sc, ch 3, Shell in each of next 3 ch1-spaces; repeat from * 18 more times, ch 3, sc in next sc, ch 3, Shell in next ch1-space, 2 dc in same space as beg, ch 1; join with slip st in top of beg ch. Fasten off. COLLAR Rnd 1 With RS facing, working across opposite side of foundation ch on neck edge, join yarn in any ch on neck edge. Ch 1, sc in same ch, sc in each ch around; do not join; work in a spiral. Mark first sc and move marker up as work progresses – 44 sc. Rnds 2-6 Sc in each sc around. At end of Rnd 6, join with slip st in next sc. Fasten off. Weave in ends. FREQUENTLY ASKED QUESTIONS ABOUT THIS PATTERN Q: In Rnd 3, where it says “Slip st in first space (working around post of last sc made) inches, what’s the post? A: sc was worked to create the last "space" of the each round. Work around the body of the sc (instead of in the top 2 loops) as if it were a ch-1 space. Q: Where is the other corner? A: There are 2 "corners" made in each rnd. One is at the center front and one at the center back of the poncho. The one corner is (3 dc, ch 1, 3 dc) halfway through the rnd. The other corner is worked in 2 pieces. You do half of the first corner at the beginning of the rnd (ch 3, 2 dc in same space), then finish it at the end of the rnd (3 dc in same space as beg, sc in 3rd ch of turning ch to join). This produces a complete "corner". Q: In the Edging instructions, Rnd 2 reads: “Slip st in first space, (ch 3, dc, ch 1, 2 dc) in same space, *ch 3, skip next sc, sc in next 3 sc, ch 3, (Shell, ch 1, Shell) in next ch1-space; repeat from * 18 more times, ch 3, skip next sc, sc in next 3 sc, ch 3, Shell in same space as beg; join with sc in top of beg ch – 40 Shells. inches but there is no sc in the previous rnd. A: There are 5 sc between the shells in Rnd 1 of the Edging. See the underlined phrases: Rnd 1 Sl st in first space, ch 3, dc in same space, * ch 3, skip next 2 dc, sc in next 5 dc, ch 3, skip next 2 dc, shell between next 2 blocks; rep from * 18 times, ch 3, skip next 2 dc, sc in next 5 dc, ch 3, skip next 2 dc, 2 dc in same space as beg, sc in 3rd ch of turning ch to join – 20 shells. Q: In the Edging, Round 1, what is a shell? A: Please see the Stitch Explanations section at the beginning of the pattern, where the definition is "Shell (2 dc, ch 1, 2 dc) in same space." Q: In the Edging instructions, Rnd 2 asks you to work into the next ch 1 space but there is no ch 1 space in the previous rnd. A: The ch 1 space is part of the shells worked in Rnd 1.Martha Stewart 'Coming Home' Poncho Lion Brand® Homespun® GAUGE: 7 dc + 4 rows = 4" [10 cm]...
SKILL: INTERMEDIATE
SIZE: One size fits most up thru 2X
HOOK: J, (K optional for beginning chain)
YARN: Bernat Baby Coordinates, Sport Weight, 3 ply, 75.2% acrylic, 22.2% acetate, 2.6% nylon. 16 oz, 1256 yards. Color - Soft Mauve
SUPPLIES: Blunt needle, scissors, stitch markers, tape measures
MEASUREMENTS: Length from neck to hem - 25". Finished neck folded flat and measured across - 13".
GAUGE: 5 clusters = 4"; 5 rows (3 cluster rows and 2 sc rows) = 3"
STITCH LIST: Chain, slip stitch, single crochet, double crochet, beginning cluster, cluster.
ABBREVIATIONS: ch - chain; sl st - slip stitch; sc - single crochet; dc - double crochet; beg cluster - beginning cluster; ea - each
SPECIAL STITCH INSTRUCTIONS:
BEGINNING CLUSTER - beg cluster: chain 3, (yarn over, insert hook in same stitch, yarn over, pull yarn thru stitch, yarn over, pull yarn thru 2 loops), 2 times, yarn over and pull yarn thru all 3 loops on hook
CLUSTER: (yarn over, insert hook in stitch, yarn over, pull yarn thru stitch, yarn over pull yarn thru 2 loops on hook) 3 times, yarn over and pull yarn thru all 4 loops on hook.
NOTES:
1. Numbers in ( ) at end of rounds tells the number of stitches for that round.
2. (**) - end the last repeat for the round at the (**) mark, then do the instructions following to end the round.
INSTRUCTIONS:
Trellis pattern is worked in multiples of 16
ROUND 1: ch 80, join to form a circle. Be careful not to twist the chain. Ch 1, sc in same st as join, sc in ea st around. Join in first sc. (80 sc)
ROUND 2: (beg cluster, ch 3, cluster) in same st as join, *sk 3 sts, (cluster, ch 3, cluster) in next st. Repeat from * around. Join in first cluster. (40 clusters and 20 ch-3 sps)
TIP: BEGINNING CLUSTER - beg cluster: chain 3, (yarn over, insert hook in same stitch, yarn over, pull yarn thru stitch, yarn over, pull yarn thru 2 loops), 2 times, yarn over and pull yarn thru all 3 loops on hook
CLUSTER: (yarn over, insert hook in stitch, yarn over, pull yarn thru stitch, yarn over pull yarn thru 2 loops on hook) 3 times, yarn over and pull yarn thru all 4 loops on hook.
ROUND 3: sl st in first ch-3 sp, ch 1, 5 sc in ea ch-3 sp around. Join in first sc. (100 sc)
ROUND 4: (beg cluster, ch 3, cluster) in same st as join,
*sk 3 sts, (cluster, ch 3, cluster) in next st. Repeat from * around. Join in first cluster. (50 clusters and 25 ch-3 sps)
ROUND 5: sl st in first ch-3 sp, ch 1, 5 sc in ea ch-3 sp around. Join in first sc. (125 scs)
ROUND 6: (Beg cluster, ch 3, cluster) in same st as join,
*sk 2 sts, (cluster, ch 3, cluster) in next st. Repeat from * around. Join in first cluster. (84 clusters and 42 ch-3 sps)
ROUND 7: sl st in next ch-3 sp, ch 1, 5 sc in ea ch-3 sp around. Join in first sc. (210 scs)
ROUND 8: (beg cluster, ch 3, cluster) in same st as join,
*sk 3 sts, (cluster, ch 3, cluster) in next st. Repeat from * around. Join in first cluster. (106 clusters and 53 ch-3 sps)
ROUND 9: sl st in next ch-3 sp, ch 1, 5 sc in ea ch-3 sp around. Join in first sc. (265 scs)
ROUND 10: ch 1, 2 sc in same st as join, *sc in next 37 sts, 2 sc in next st, repeat from * around. End with sc in next 35 sts. Join in first sc. (272 scs)
ROUND 11: ch 1, sc in same st as join, (ch 5, sk 3 sts, sc in next st) twice
*sk next st,
5 dc in next st,
sk next st,
sc in next st.
(ch 5, sk 3 sts, sc in next st) 3 times. Repeat from * around. End with ch 5, sk 3 sts, join in first sc. (51 ch-5 sps)
ROUND 12: sl st in next 3 chs, ch 1, sc in ch-5 sp, ch 5, sc in next ch-5 sp,
*5 dc in next sc,
sk 2 dc
sc in next dc,
sk 2 dc,
5 dc in next sc
sc in next ch-5 sp (**)
(ch 5, sc in next ch-5 sp) twice. Repeat from * around, end last repeat at (**). Ch 5, join in first sc. (34 ch-5 sps)
ROUND 13: sl st in next 3 chs, ch 1, sc in ch-5 sp,
*5 dc in next sc,
sk 2 dc,
sc in next dc,
ch 5,
sk 2 dc, sc, and 2 dc,
sc in next dc
sk 2 dc,
5 dc in next sc,
sc in next ch-5 sp
ch 5, (**)
sc in next ch-5 sp. Repeat from * around, end last repeat at (**). join in first sc. (34 ch-5 sps)
ROUND 14: sl st in next 2 sts, ch 1
*sc in next dc
ch 5,
sk 2 dc and sc,
sc in next ch-5 sp
ch 5, sk sc and 2 dc,
sc in next dc,
sk 2 dc
5 dc in next sc
sc in next ch-5 sp,
5 dc in next sc,
sk 2 dc. Repeat from * around. Join in first sc. (34 ch-5 sps)
ROUND 15: sl st in next 3 chs, ch 1
*sc in ch-5 sp,
ch 5,
sc in next ch-5 sp,
ch 5, sk sc and 2 dc,
sc in next dc,
sk 2 dc,
5 dc in next sc,
sk 2 dc,
sc in next dc,
ch 5,
sk 2 dc and 1 sc. Repeat from * around. Join in first sc. (51 ch-5 sps)
ROUNDS 16 thru 35: (Repeat rounds 12 through 15) 5 times, or to desired length.
ROUND 36: sl st in next 3 chs, ch 1, sc in ch-5 sp, 5 dc in next sc, sc in next ch-5 sp,
*5 dc in next sc,
sk 2 dc,
sc in next dc, (**)
sk 2 sc,
(5 dc in next sc, sc in next ch-5 sp) 3 times. Repeat from * around, End last repeat at (**), then
sk 2 dc,
5 dc in next sc,
sc in next ch-5 sp,
5 dc in next sc. Join in first sc.
Fasten off and weave in ends.
NECK EDGING
Attach yarn in any stitch at back of neck edge.
ROUND 1: ch 1, sc in ea st around. Join in first sc. (80 sc)
ROUND 2: ch 1, sc in same st as join, sc in next 2 sts.
*sc 2 tog, sc in next 3 sts. Repeat from * around. Join in first sc. (64 scs)
TIP: SC 2 TOG - insert hook in next st, yo, pull yarn thru st, insert hook in next st, yo, pull yarn thru st, yo and pull thru all 3 loops on hook.
ROUND 3: ch 1, sc in same st as join, sk 1 sc,
*5 dc in next st, sk 1 sc, sc in next st. Repeat from * around. Join in first sc.
Fasten off and weave in ends.
SIZE: One size fits most adult
SKILL: Easy
You will need:
Hooks: L – optional for foundation chain; K – for pattern
Yarn: 775yds/15oz I used Caron Pound for this project. I'm not sure of the color (the band was missing)
Blunt needle for weaving in ends
STITCHES: chain (ch); double crochet (dc); single crochet (sc)
Shell = 5 dc all in one stitch
Abbreviations used: sk = skip
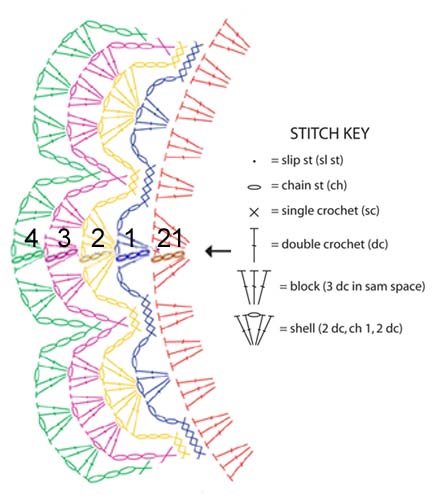
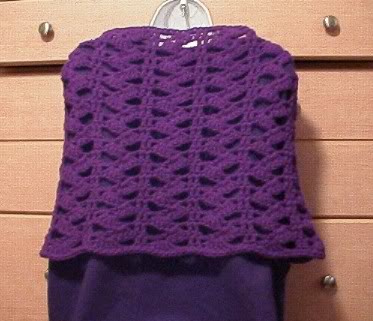
GAUGE: 5 rows = 4"; 1 pattern repeat = 3 1/2". Gauge is approximate and not very important to this pattern because it's just a large rectangle and can be made to any size you like.
Pattern worked in multiples of 8 + 4
With L hook, ch 204. Switch to K hook
Row 1: dc in 4th ch from hook,
*sk next 2 chs,
5 dc in next ch (for shell)
ch 2, sk next 3 chs,
dc in next 2 chs. Repeat from * across. Ch 3, turn.
Row 2: sk first dc, dc in next dc,
*shell in first dc of next shell,
ch 2, sk 4 dc,
dc in next 2 dc. Repeat from * across, ending last dc in top of turning ch. Ch 3, turn.
Row 3 thru 20: Repeat row 2. If you want a wider stole, keep repeating row 2 until your stole is as wide as you want.
EDGING
At end of row 20, ch 1, pivot piece to work along short side. Sc evenly around all 4 sides of stole, placing 3 sc in corners. Join to first sc.
Fasten off and weave in ends.
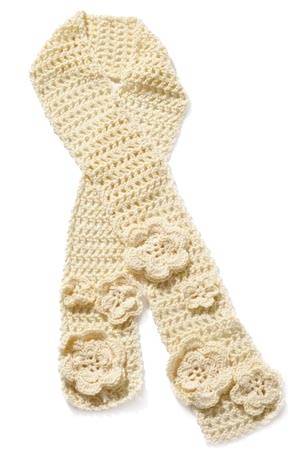
Flowered Scarf
Lion Brand® Microspun
GAUGE:
8 dc + 7 rows = 4 in. with larger hook. BE SURE TO CHECK YOUR GAUGE.
NOTES:
Ch 4 at end of row counts as first dc and ch-1 sp of next row throughout.
SCARF
With larger hook, ch 22.
Row 1 (RS) Dc in 6th ch from hook (counts as first dc and ch1-sp), * ch 1, sk 1 ch, dc in next ch; rep from * across – 10 dcs and 9 ch-1 sps. Ch 4, turn.
Row 2 Sk next ch-1 sp, dc in next dc. * ch 1, sk next ch-1 sp, dc in next dc; rep from * across. Ch 4, turn.
Rows 3-99 Rep Row 2.
Row 100 Sk next ch-1 sp, dc in next dc, * ch 1, sk next ch-1 sp, dc in next dc; rep from * across. Ch 2, turn.
Border
Sk next ch-1 sp , sl st in next ch, * ch 2, sk next ch-1 sp, sl st in next dc; rep from * across; ending with ch 2, sk 1 ch, in top of turning ch. Turn to work along one long side, ** ch 2, sk post of next dc, sl st in top of next dc (or in ch 3 of turning ch); rep from ** across; end with ch 2, sk last dc, in corner ch. Turn to work along opposite edge of beg ch, * ch 2, sk 1 ch, sl st in next ch; rep from * across; end with ch 1, sk 1 ch, in next ch. Turn to work along remaining long edge and rep from **; end with ch 2, sk last dc, in corner ch, sl st to beg st to join. Fasten off.
SMALL FLOWER (Make 2)
With smaller hook, ch 4. Join with sl st to form a ring.
Rnd 1 Ch 5 (counts as first sc and ch 3), * sc in ring, ch 3; rep from * 5 times; join with sl st to 2nd ch of beg ch.
Rnd 2 * in next ch-3 sp, rep from * 6 times; join with sl st to beg sc. Fasten off.
MEDIUM FLOWER (Make 2)
Rnds 1 and 2 Work Rnds 1 and 2 as for Small Flower.
Rnd 3 Sc through back lp of first sc of Rnd 2, ch 3, * sk next of Rnd 2, sc through back lp of next sc of Rnd 2, ch 3, rep from * 5 times, join with sl st to beg sc.
Rnd 4 * in next ch sp; rep from * 6 times, join with sl st to beg sc. Fasten off.
LARGE FLOWER (Make 3)
Rnds 1 and 2 Work Rnds 1 and 2 as for Small Flower.
Rnd 3 Sc through back lp of first sc of Rnd 2, ch 6, * sk next of Rnd 2, sc through back lp of next sc of Rnd 2, ch 6, rep from * 5 times, join with sl st to beg sc.
Rnd 4 * in next ch sp; rep from * 6 times, join with sl st to beg sc.
Rnd 5 Sc through back lp of first sc, ch 6, * sk next , sc through back lp of next sc, ch 6; rep from * 5 times; join with sl st to beg sc.
Rnd 6 * in next ch sp; rep from * 6 times, join with sl st to beg sc. Fasten off.
FINISHING
Following photo, sew flowers to scarf. On one end of the scarf, position a large flower at the end and then group a medium and small one slightly above it. On the other end of the scarf, group a large flower and a small one at the end and then a medium one and a small one above the first group. Weave in ends.
Materials: K hook; 16 oz Bernat Super Value, 1 oz contrasting yarn for trim.
Stitches used: chain, single crochet, slip stitch, treble (triple)
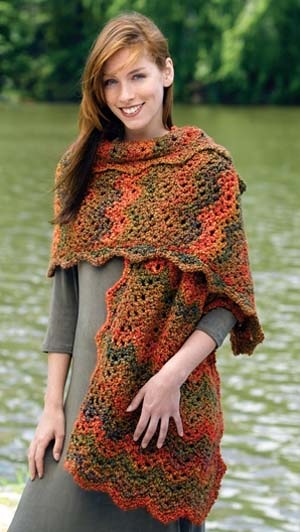
This pattern stitch is called "peacock stitch" and is found on page 76 in "The Crochet Stitch Bible", by Betty Barnden.
Abbreviations used:
ch = chain
sc = single crochet
sl st = slip stitch
sk = skip
tr = treble
ch-# = chain followed by a dash, followed by a number, refers to a chain made in the previous round. example ch-3
Size: 21" x 63" rectangle
Gauge: 4 rows = 3" each scallop = 3"
Gauge and size is approximate. When measuring, please take into consideration, your stole and my stole may not be EXACTLY the same size. Mine might have been stretched a little more, or less, than yours when measured.
INSTRUCTIONS
ROW 1: ch 181, sc in 2nd ch from hook, *sk 4 ch, 9 tr in next ch, sk 4 ch, 1 sc in next ch. Repeat from * to end. Turn.
HINT: skip 4 stitches, place a marker in the next stitch, across the chain to keep from losing stitches.
ROW 2: ch 4, 1 tr in first sc, *ch 3, sk 4 tr, 1 sc in next tr, ch 3, sk 4 tr, 2 tr in next sc. Repeat from * across, end with 2 tr in last sc. Turn.
ROW 3: ch 1, sc BETWEEN the first 2 tr, *sk ch-3, 9 tr in next sc, sk ch-3, 1 sc BETWEEN the next 2 tr. Repeat from * across, end with 1 sc BETWEEN last tr and turning ch. Turn.
Repeat row 2 and 3 to desired width. End with Row 2.
Fasten off, weave in ends.
TRIM
With right side facing, attach contrasting color in top of beginning chain of last row completed. (this is the top edge)
ROW 1:
TOP EDGE: ch 1, 3 sc in same st as join, sc in next tr, *3 sc in next ch-3 space, 1 sc in next sc, (1 sc in next tr) twice. Repeat from * across top edge, end with 3 sc in last tr of top edge.
SIDE EDGE 1: *3 sc in side of next tr, 1 sc in side of next sc. Repeat from * across side edge, end with 3 sc in the corner.
BOTTOM EDGE: *3 sc in next ch-3 space, 1 sc in the bottom of the next tr cluster, 3 sc in next ch-3 sp, 1 sc in next sc, repeat from * across bottom edge, end with 3 sc in the corner.
SIDE EDGE 2: Repeat side edge 1. Join in first sc.
ROW 2: ch 1, sl st in same st as join, *ch 1, sl st in next st. Repeat from * around, join in first sl st.
Fasten off, weave in ends.
Magic Chevrons
Lion Brand® Homespun®
GAUGE:
8 stitches = 4" (10 cm); Rows 1–3 = 21⁄2" (6.5 cm). BE SURE TO CHECK YOUR GAUGE.
STITCH EXPLANATION:
Single crochet 2 together (single crochet decrease) Insert hook into stitch and draw up a loop. Insert hook into next stitch and draw up a loop. Yarn over, draw through all 3 loops on hook.
Shell in same stitch.
NOTES:
Wrap is made of 2 halves worked off a center foundation chain.
First half
Chain 42.
Row 1 (Wrong Side) Single crochet in 2nd chain from hook and in each chain across. Turn—41 single crochet.
Row 2 Chain 1, single crochet in first single crochet, *chain 1, skip next single crochet, half double crochet in next single crochet, chain 1, skip next single crochet, in next single crochet, chain 1, skip next single crochet, half double crochet in next single crochet, chain 1, skip next single crochet, single crochet in next single crochet; repeat from * across. Turn—5 chain 2-spaces.
Row 3 Chain 1, single crochet 2 together in first 2 stitches, chain 1, single crochet in next chain 1-space, chain 1, in next chain 2-space, * in each of next 2 chain 1-spaces, in each of next 2 chain 1-spaces, in next chain 2-space; repeat from * across to last 5 stitches, chain 1, single crochet in next chain 1-space, chain 1, single crochet 2 together in last 2 stitches. Turn—5 chain 2-spaces.
Row 4 Chain 1, single crochet 2 together in first 2 stitches, chain 1, half double crochet in next chain 1-space, chain 1, in next chain 2-space, *chain 1, half double crochet in next chain 1-space, chain 1, single crochet in each of next 2 chain 1-spaces, chain 1, half double crochet in next chain 1-space, chain 1, in next chain 2-space; repeat from * across to last 5 stitches, chain 1, half double crochet in next chain 1-space, chain 1, single crochet 2 together in last 2 stitches. Turn—5 chain 2-spaces.
Rows 5–56 Repeat Rows 3–4.
Fasten off.
Second half
Row 1 With wrong side facing, working across opposite side of foundation chain, join yarn in first chain. Chain 1, single crochet in each chain across. Turn—41 single crochet.
Rows 2–56 Repeat Rows 2–56 of First Half. Do not fasten off.
Border
Round 1 (Right Side) Working across long edge of wrap, chain 1, *work 1 single crochet in each of next 56 row-end stitches, single crochet in foundation chain, single crochet in each of next 56 row-end stitches to next corner, chain 2, work in established pattern of Row 3 of First Half across short edge of wrap, chain 2; repeat from * around.
Join with slip stitch in first single crochet.
Round 2 Chain 1, **single crochet in first single crochet, *chain 1, skip next 2 single crochet, shell in next single crochet, chain 1, skip next 2 single crochet, single crochet in next single crochet *; repeat from * to * 9 more times, chain 1, skip next single crochet, shell in next single crochet, chain 1 skip next single crochet, single crochet in next single crochet; repeat from * to * 9 times, in corner chain 2-space, work in established pattern of Row 4 of First Half across short edge of wrap, in corner chain 2-space; repeat from ** around; join with slip stitch in first single crochet.
Round 3 Slip stitch in first chain 1-space, chain 1, ** across to next corner chain 2-space, in each chain 1-space and each chain 2-space across short edge of wrap, ending in corner chain 2-space, chain 2; repeat from ** around. Join with slip stitch in first single crochet.
Finishing
Fasten off. Weave in ends.
SIZE: One size fits most up thru 2X
HOOK: J, (K optional for beginning chain)
YARN: Bernat Baby Coordinates, Sport Weight, 3 ply, 75.2% acrylic, 22.2% acetate, 2.6% nylon. 16 oz, 1256 yards. Color - Soft Mauve
SUPPLIES: Blunt needle, scissors, stitch markers, tape measures
MEASUREMENTS: Length from neck to hem - 25". Finished neck folded flat and measured across - 13".
GAUGE: 5 clusters = 4"; 5 rows (3 cluster rows and 2 sc rows) = 3"
STITCH LIST: Chain, slip stitch, single crochet, double crochet, beginning cluster, cluster.
ABBREVIATIONS: ch - chain; sl st - slip stitch; sc - single crochet; dc - double crochet; beg cluster - beginning cluster; ea - each
SPECIAL STITCH INSTRUCTIONS:
BEGINNING CLUSTER - beg cluster: chain 3, (yarn over, insert hook in same stitch, yarn over, pull yarn thru stitch, yarn over, pull yarn thru 2 loops), 2 times, yarn over and pull yarn thru all 3 loops on hook
CLUSTER: (yarn over, insert hook in stitch, yarn over, pull yarn thru stitch, yarn over pull yarn thru 2 loops on hook) 3 times, yarn over and pull yarn thru all 4 loops on hook.
NOTES:
1. Numbers in ( ) at end of rounds tells the number of stitches for that round.
2. (**) - end the last repeat for the round at the (**) mark, then do the instructions following to end the round.
INSTRUCTIONS:
Trellis pattern is worked in multiples of 16
ROUND 1: ch 80, join to form a circle. Be careful not to twist the chain. Ch 1, sc in same st as join, sc in ea st around. Join in first sc. (80 sc)
ROUND 2: (beg cluster, ch 3, cluster) in same st as join, *sk 3 sts, (cluster, ch 3, cluster) in next st. Repeat from * around. Join in first cluster. (40 clusters and 20 ch-3 sps)
TIP: BEGINNING CLUSTER - beg cluster: chain 3, (yarn over, insert hook in same stitch, yarn over, pull yarn thru stitch, yarn over, pull yarn thru 2 loops), 2 times, yarn over and pull yarn thru all 3 loops on hook
CLUSTER: (yarn over, insert hook in stitch, yarn over, pull yarn thru stitch, yarn over pull yarn thru 2 loops on hook) 3 times, yarn over and pull yarn thru all 4 loops on hook.
ROUND 3: sl st in first ch-3 sp, ch 1, 5 sc in ea ch-3 sp around. Join in first sc. (100 sc)
ROUND 4: (beg cluster, ch 3, cluster) in same st as join,
*sk 3 sts, (cluster, ch 3, cluster) in next st. Repeat from * around. Join in first cluster. (50 clusters and 25 ch-3 sps)
ROUND 5: sl st in first ch-3 sp, ch 1, 5 sc in ea ch-3 sp around. Join in first sc. (125 scs)
ROUND 6: (Beg cluster, ch 3, cluster) in same st as join,
*sk 2 sts, (cluster, ch 3, cluster) in next st. Repeat from * around. Join in first cluster. (84 clusters and 42 ch-3 sps)
ROUND 7: sl st in next ch-3 sp, ch 1, 5 sc in ea ch-3 sp around. Join in first sc. (210 scs)
ROUND 8: (beg cluster, ch 3, cluster) in same st as join,
*sk 3 sts, (cluster, ch 3, cluster) in next st. Repeat from * around. Join in first cluster. (106 clusters and 53 ch-3 sps)
ROUND 9: sl st in next ch-3 sp, ch 1, 5 sc in ea ch-3 sp around. Join in first sc. (265 scs)
ROUND 10: ch 1, 2 sc in same st as join, *sc in next 37 sts, 2 sc in next st, repeat from * around. End with sc in next 35 sts. Join in first sc. (272 scs)
ROUND 11: ch 1, sc in same st as join, (ch 5, sk 3 sts, sc in next st) twice
*sk next st,
5 dc in next st,
sk next st,
sc in next st.
(ch 5, sk 3 sts, sc in next st) 3 times. Repeat from * around. End with ch 5, sk 3 sts, join in first sc. (51 ch-5 sps)
ROUND 12: sl st in next 3 chs, ch 1, sc in ch-5 sp, ch 5, sc in next ch-5 sp,
*5 dc in next sc,
sk 2 dc
sc in next dc,
sk 2 dc,
5 dc in next sc
sc in next ch-5 sp (**)
(ch 5, sc in next ch-5 sp) twice. Repeat from * around, end last repeat at (**). Ch 5, join in first sc. (34 ch-5 sps)
ROUND 13: sl st in next 3 chs, ch 1, sc in ch-5 sp,
*5 dc in next sc,
sk 2 dc,
sc in next dc,
ch 5,
sk 2 dc, sc, and 2 dc,
sc in next dc
sk 2 dc,
5 dc in next sc,
sc in next ch-5 sp
ch 5, (**)
sc in next ch-5 sp. Repeat from * around, end last repeat at (**). join in first sc. (34 ch-5 sps)
ROUND 14: sl st in next 2 sts, ch 1
*sc in next dc
ch 5,
sk 2 dc and sc,
sc in next ch-5 sp
ch 5, sk sc and 2 dc,
sc in next dc,
sk 2 dc
5 dc in next sc
sc in next ch-5 sp,
5 dc in next sc,
sk 2 dc. Repeat from * around. Join in first sc. (34 ch-5 sps)
ROUND 15: sl st in next 3 chs, ch 1
*sc in ch-5 sp,
ch 5,
sc in next ch-5 sp,
ch 5, sk sc and 2 dc,
sc in next dc,
sk 2 dc,
5 dc in next sc,
sk 2 dc,
sc in next dc,
ch 5,
sk 2 dc and 1 sc. Repeat from * around. Join in first sc. (51 ch-5 sps)
ROUNDS 16 thru 35: (Repeat rounds 12 through 15) 5 times, or to desired length.
ROUND 36: sl st in next 3 chs, ch 1, sc in ch-5 sp, 5 dc in next sc, sc in next ch-5 sp,
*5 dc in next sc,
sk 2 dc,
sc in next dc, (**)
sk 2 sc,
(5 dc in next sc, sc in next ch-5 sp) 3 times. Repeat from * around, End last repeat at (**), then
sk 2 dc,
5 dc in next sc,
sc in next ch-5 sp,
5 dc in next sc. Join in first sc.
Fasten off and weave in ends.
NECK EDGING
Attach yarn in any stitch at back of neck edge.
ROUND 1: ch 1, sc in ea st around. Join in first sc. (80 sc)
ROUND 2: ch 1, sc in same st as join, sc in next 2 sts.
*sc 2 tog, sc in next 3 sts. Repeat from * around. Join in first sc. (64 scs)
TIP: SC 2 TOG - insert hook in next st, yo, pull yarn thru st, insert hook in next st, yo, pull yarn thru st, yo and pull thru all 3 loops on hook.
ROUND 3: ch 1, sc in same st as join, sk 1 sc,
*5 dc in next st, sk 1 sc, sc in next st. Repeat from * around. Join in first sc.
Fasten off and weave in ends.
SIZE: One size fits most adult
SKILL: Easy
You will need:
Hooks: L – optional for foundation chain; K – for pattern
Yarn: 775yds/15oz I used Caron Pound for this project. I'm not sure of the color (the band was missing)
Blunt needle for weaving in ends
STITCHES: chain (ch); double crochet (dc); single crochet (sc)
Shell = 5 dc all in one stitch
Abbreviations used: sk = skip
GAUGE: 5 rows = 4"; 1 pattern repeat = 3 1/2". Gauge is approximate and not very important to this pattern because it's just a large rectangle and can be made to any size you like.
Pattern worked in multiples of 8 + 4
With L hook, ch 204. Switch to K hook
Row 1: dc in 4th ch from hook,
*sk next 2 chs,
5 dc in next ch (for shell)
ch 2, sk next 3 chs,
dc in next 2 chs. Repeat from * across. Ch 3, turn.
Row 2: sk first dc, dc in next dc,
*shell in first dc of next shell,
ch 2, sk 4 dc,
dc in next 2 dc. Repeat from * across, ending last dc in top of turning ch. Ch 3, turn.
Row 3 thru 20: Repeat row 2. If you want a wider stole, keep repeating row 2 until your stole is as wide as you want.
EDGING
At end of row 20, ch 1, pivot piece to work along short side. Sc evenly around all 4 sides of stole, placing 3 sc in corners. Join to first sc.
Fasten off and weave in ends.
Flowered Scarf
Lion Brand® Microspun
GAUGE:
8 dc + 7 rows = 4 in. with larger hook. BE SURE TO CHECK YOUR GAUGE.
NOTES:
Ch 4 at end of row counts as first dc and ch-1 sp of next row throughout.
SCARF
With larger hook, ch 22.
Row 1 (RS) Dc in 6th ch from hook (counts as first dc and ch1-sp), * ch 1, sk 1 ch, dc in next ch; rep from * across – 10 dcs and 9 ch-1 sps. Ch 4, turn.
Row 2 Sk next ch-1 sp, dc in next dc. * ch 1, sk next ch-1 sp, dc in next dc; rep from * across. Ch 4, turn.
Rows 3-99 Rep Row 2.
Row 100 Sk next ch-1 sp, dc in next dc, * ch 1, sk next ch-1 sp, dc in next dc; rep from * across. Ch 2, turn.
Border
Sk next ch-1 sp , sl st in next ch, * ch 2, sk next ch-1 sp, sl st in next dc; rep from * across; ending with ch 2, sk 1 ch, in top of turning ch. Turn to work along one long side, ** ch 2, sk post of next dc, sl st in top of next dc (or in ch 3 of turning ch); rep from ** across; end with ch 2, sk last dc, in corner ch. Turn to work along opposite edge of beg ch, * ch 2, sk 1 ch, sl st in next ch; rep from * across; end with ch 1, sk 1 ch, in next ch. Turn to work along remaining long edge and rep from **; end with ch 2, sk last dc, in corner ch, sl st to beg st to join. Fasten off.
SMALL FLOWER (Make 2)
With smaller hook, ch 4. Join with sl st to form a ring.
Rnd 1 Ch 5 (counts as first sc and ch 3), * sc in ring, ch 3; rep from * 5 times; join with sl st to 2nd ch of beg ch.
Rnd 2 * in next ch-3 sp, rep from * 6 times; join with sl st to beg sc. Fasten off.
MEDIUM FLOWER (Make 2)
Rnds 1 and 2 Work Rnds 1 and 2 as for Small Flower.
Rnd 3 Sc through back lp of first sc of Rnd 2, ch 3, * sk next of Rnd 2, sc through back lp of next sc of Rnd 2, ch 3, rep from * 5 times, join with sl st to beg sc.
Rnd 4 * in next ch sp; rep from * 6 times, join with sl st to beg sc. Fasten off.
LARGE FLOWER (Make 3)
Rnds 1 and 2 Work Rnds 1 and 2 as for Small Flower.
Rnd 3 Sc through back lp of first sc of Rnd 2, ch 6, * sk next of Rnd 2, sc through back lp of next sc of Rnd 2, ch 6, rep from * 5 times, join with sl st to beg sc.
Rnd 4 * in next ch sp; rep from * 6 times, join with sl st to beg sc.
Rnd 5 Sc through back lp of first sc, ch 6, * sk next , sc through back lp of next sc, ch 6; rep from * 5 times; join with sl st to beg sc.
Rnd 6 * in next ch sp; rep from * 6 times, join with sl st to beg sc. Fasten off.
FINISHING
Following photo, sew flowers to scarf. On one end of the scarf, position a large flower at the end and then group a medium and small one slightly above it. On the other end of the scarf, group a large flower and a small one at the end and then a medium one and a small one above the first group. Weave in ends.
Materials: K hook; 16 oz Bernat Super Value, 1 oz contrasting yarn for trim.
Stitches used: chain, single crochet, slip stitch, treble (triple)
This pattern stitch is called "peacock stitch" and is found on page 76 in "The Crochet Stitch Bible", by Betty Barnden.
Abbreviations used:
ch = chain
sc = single crochet
sl st = slip stitch
sk = skip
tr = treble
ch-# = chain followed by a dash, followed by a number, refers to a chain made in the previous round. example ch-3
Size: 21" x 63" rectangle
Gauge: 4 rows = 3" each scallop = 3"
Gauge and size is approximate. When measuring, please take into consideration, your stole and my stole may not be EXACTLY the same size. Mine might have been stretched a little more, or less, than yours when measured.
INSTRUCTIONS
ROW 1: ch 181, sc in 2nd ch from hook, *sk 4 ch, 9 tr in next ch, sk 4 ch, 1 sc in next ch. Repeat from * to end. Turn.
HINT: skip 4 stitches, place a marker in the next stitch, across the chain to keep from losing stitches.
ROW 2: ch 4, 1 tr in first sc, *ch 3, sk 4 tr, 1 sc in next tr, ch 3, sk 4 tr, 2 tr in next sc. Repeat from * across, end with 2 tr in last sc. Turn.
ROW 3: ch 1, sc BETWEEN the first 2 tr, *sk ch-3, 9 tr in next sc, sk ch-3, 1 sc BETWEEN the next 2 tr. Repeat from * across, end with 1 sc BETWEEN last tr and turning ch. Turn.
Repeat row 2 and 3 to desired width. End with Row 2.
Fasten off, weave in ends.
TRIM
With right side facing, attach contrasting color in top of beginning chain of last row completed. (this is the top edge)
ROW 1:
TOP EDGE: ch 1, 3 sc in same st as join, sc in next tr, *3 sc in next ch-3 space, 1 sc in next sc, (1 sc in next tr) twice. Repeat from * across top edge, end with 3 sc in last tr of top edge.
SIDE EDGE 1: *3 sc in side of next tr, 1 sc in side of next sc. Repeat from * across side edge, end with 3 sc in the corner.
BOTTOM EDGE: *3 sc in next ch-3 space, 1 sc in the bottom of the next tr cluster, 3 sc in next ch-3 sp, 1 sc in next sc, repeat from * across bottom edge, end with 3 sc in the corner.
SIDE EDGE 2: Repeat side edge 1. Join in first sc.
ROW 2: ch 1, sl st in same st as join, *ch 1, sl st in next st. Repeat from * around, join in first sl st.
Fasten off, weave in ends.
Magic Chevrons
Lion Brand® Homespun®
GAUGE:
8 stitches = 4" (10 cm); Rows 1–3 = 21⁄2" (6.5 cm). BE SURE TO CHECK YOUR GAUGE.
STITCH EXPLANATION:
Single crochet 2 together (single crochet decrease) Insert hook into stitch and draw up a loop. Insert hook into next stitch and draw up a loop. Yarn over, draw through all 3 loops on hook.
Shell in same stitch.
NOTES:
Wrap is made of 2 halves worked off a center foundation chain.
First half
Chain 42.
Row 1 (Wrong Side) Single crochet in 2nd chain from hook and in each chain across. Turn—41 single crochet.
Row 2 Chain 1, single crochet in first single crochet, *chain 1, skip next single crochet, half double crochet in next single crochet, chain 1, skip next single crochet, in next single crochet, chain 1, skip next single crochet, half double crochet in next single crochet, chain 1, skip next single crochet, single crochet in next single crochet; repeat from * across. Turn—5 chain 2-spaces.
Row 3 Chain 1, single crochet 2 together in first 2 stitches, chain 1, single crochet in next chain 1-space, chain 1, in next chain 2-space, * in each of next 2 chain 1-spaces, in each of next 2 chain 1-spaces, in next chain 2-space; repeat from * across to last 5 stitches, chain 1, single crochet in next chain 1-space, chain 1, single crochet 2 together in last 2 stitches. Turn—5 chain 2-spaces.
Row 4 Chain 1, single crochet 2 together in first 2 stitches, chain 1, half double crochet in next chain 1-space, chain 1, in next chain 2-space, *chain 1, half double crochet in next chain 1-space, chain 1, single crochet in each of next 2 chain 1-spaces, chain 1, half double crochet in next chain 1-space, chain 1, in next chain 2-space; repeat from * across to last 5 stitches, chain 1, half double crochet in next chain 1-space, chain 1, single crochet 2 together in last 2 stitches. Turn—5 chain 2-spaces.
Rows 5–56 Repeat Rows 3–4.
Fasten off.
Second half
Row 1 With wrong side facing, working across opposite side of foundation chain, join yarn in first chain. Chain 1, single crochet in each chain across. Turn—41 single crochet.
Rows 2–56 Repeat Rows 2–56 of First Half. Do not fasten off.
Border
Round 1 (Right Side) Working across long edge of wrap, chain 1, *work 1 single crochet in each of next 56 row-end stitches, single crochet in foundation chain, single crochet in each of next 56 row-end stitches to next corner, chain 2, work in established pattern of Row 3 of First Half across short edge of wrap, chain 2; repeat from * around.
Join with slip stitch in first single crochet.
Round 2 Chain 1, **single crochet in first single crochet, *chain 1, skip next 2 single crochet, shell in next single crochet, chain 1, skip next 2 single crochet, single crochet in next single crochet *; repeat from * to * 9 more times, chain 1, skip next single crochet, shell in next single crochet, chain 1 skip next single crochet, single crochet in next single crochet; repeat from * to * 9 times, in corner chain 2-space, work in established pattern of Row 4 of First Half across short edge of wrap, in corner chain 2-space; repeat from ** around; join with slip stitch in first single crochet.
Round 3 Slip stitch in first chain 1-space, chain 1, ** across to next corner chain 2-space, in each chain 1-space and each chain 2-space across short edge of wrap, ending in corner chain 2-space, chain 2; repeat from ** around. Join with slip stitch in first single crochet.
Finishing
Fasten off. Weave in ends.


الصفحة الأخيرة