Foundation: With color A, ch 4, sl st to form a ring. تبدأي ب 4 سلاسل وتقفليهم بمنزلقه عشان تتحصلي عالدائرة Round 1: ch 3 to count as first hdc. 8 hdc. (9) Do not join. Mark the first ch 3 with a small piece of contrasting yarn at the base. (9) Rounds 1-2 will be a continuous spiral; do not join, continue in a spiral.
Round 2: ****ing in back loops, only, make 2 hdc in each st around (18). Do not join.
Round 3: ****ing in back loops, only, make 2 hdc in each st. Sl st in the back loop of the next st to end the row and break off. (36)
Round 4-6: Still using color A, join with a sl st in the front loop of the first ch 3/hdc that is marked by piece of contrasting yarn. Once you determine this starting st, you can remove the marker and then (ch 3, 3 dc, ch 3, sl st) in that same front loop.
In the next 9 front loops in the spiral: (sl st, ch 3, 3 dc, ch 3, sl st). Total of 10 petals.
From here to the end of the spiral, crochet the same sequence: (sl st, ch 3, 3 dc, ch 3, sl st) in every other front loop: Break off color, bring all yarn tails to the back of this rose and secure the ends.
Round 7: Using color B (leaves), 3 ch in any back loop of the rose to count as first dc. In the same st: dc, ch 2, 2 dc. Ch 1. *Skip 3 back loops, in the fourth back loop: (2 dc, ch 2, 2 dc) ch 1. Repeat from * around for a total of 9 of these sets.
Round 7 is the same as the round nearest to the center in the diagram below.
NOTE: on Rounds 8-11, skip over two stitches from the end of one ripple and two more stitches to start the next ripple. In other words, there are four stitches skipped between ripples. The skipped stitches are seen in red-orange in the diagram below.
Round 8: *In ch 2 sp, (3 dc, ch 2, 3 dc). Repeat from * in all ch 2 spaces around. Break off color. Round 9: This will a round in which there are four dc's going up the ripple to the peak and then, after 2 ch's, four going down to the valley. With color C (background color), join in any ch 2 sp. Ch 3 (to serve as first dc), dc, ch 2, 2 dc, 2 dc in the top of the next dc, Skip over 4 dc’s and in the top of the one before the ch 2 sp, 2 dc. *In the ch 2 sp, (2 dc, ch 2, 2 dc). 2 dc in the next st. Repeat from * around and end with 2 dc in the st before the cluster in the ch 2 sp. Sl st to join round. Round 10: This will be a round in which there will be five dc’s going up the ripple to the peak and 5 going down to the valley. Sl st to start in the ch 2 sp. In the ch 2 space, ch 3 (first dc), dc, ch 2, 2 dc . Dc in the next st, 2 dc in the next st, Skip four st. 2 dc after the second st in the ripple. 1 dc in the next st. *In the ch 2 sp (2 dc, ch 2, 2 dc). Dc in the next st, 2 dc in the next st. Skip four st. 2 dc in the next st, 1 dc in the next st. Repeat from * around. Join with a sl st to complete the round. Round 11: This will be a round of hdc’s instead of dc’s. There will be six hdc’s up the ripple to the peak and six going down the ripple to the valley. Starting in the ch 2 space: (ch 2, hdc, ch 2, 2 hdc), 1 hdc in each of the next 2 st's, 2 hdc in the next st. Skip four st's. 2 hdc in the next st, 1 hdc in each of the next 2 st's. *in ch 2 sp **** (2 hdc, ch 2, 2 hdc), 1 hdc in each of the next 2 st's, 2 hdc in the next st. Skip 4 st's, 2 hdc in the next st, 1 hdc in each of the next 2 st's. Repeat from * around. Join with a sl st to end the round. Break off leaving a 7-inch tail. This completes side one of your Rose Ripple Potholder. The only difference between sides one and two is in the center. The yellow in the center is flat, no rose is made. The three rounds of hdc, instead of being ****ed in a spiral in back loops, is made the usual way:
-9 hdc's for the first round, joined by a sl st
-18 hdc's in the second round and joined by a sl st
-36 hdc's in the third round, joined by a sl st
Joining round: For the joining round, a potholder in other colors will be used so you can see the contrasting stitch colors better than using white on white as in the above example.
With wrong sides together and right sides facing out, match up points of both sides of potholder. Starting at the center top of the potholder, (which should be a valley), join yarn (and leaving a 7 inch tail for later use to attach the hanging ring) sc through both front and back pieces.
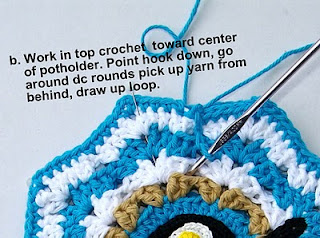
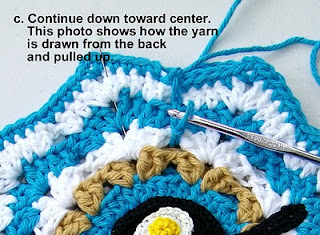
You are going to go toward the center of the potholder with a series of top crochet stitches in the valley between ripples. **** top crochet stitches like this: around the last hdc round to the back to catch the yarn and bring it from the back to the front to complete what looks like a ch stitch. Continue toward the center going down, around, under the next dc round to the back and picking up the yarn to bring to the front.
This photo shows the hook pointed down, around and under a dc round.The next photo shows the yarn, having been caught from the back and being brought up to make the front st. The back st is a straight line but the front st looks like a ch. Note: Be sure to keep checking the back to make sure you are catching the stitch in the same open space under the dc rounds on both sides of the potholder. Continue toward the center with the front to back top crochet stitches. At the center, catch the top st of the center color on both the front and back sides. Draw up your stitch to make a nice, neat little st. You may want to use your fingernail (left hand) to hold the st in place as you complete the pulling up.
At this point, you will be going back up toward the outer edge. Your stitches will be adjacent to the first line of st going down and slightly to the left.
This photo shows the nearly finished second row of st's returning back to the outer edge. At this point, when you reach the top, go over the top to catch the yarn and draw up.
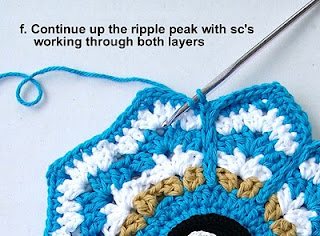
Continue with sc's in each st, again going through both front and back pieces, to the top of the ripple peak (i.e. ch 2 sp). When you get to the ch 2 sp, *sc, c1, sc. Sc in next 6 sc going down the side of the ripple, continue with the two lines of stitches as shown in photo examples a-e.
Continue around the potholder Sc in the next 6 st's to the left of the valley (going up the next ripple/peak) Repeat from * around. St st to the top of the first sc. Leave a 30 inch tail before breaking off.
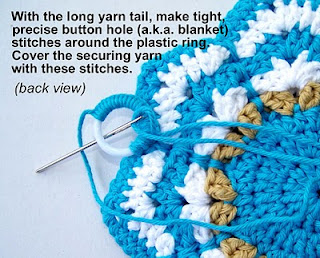
Plastic hanging loop: Using a blunt tapestry needle and with the 7 inch yarn tail, secure the loop in place by going around the ring a few times and catching the body of the potholder with each loop. Then, with the longer yarn tail, make tight button hole/blanket stitches around the loop. Cover your initial securing loops with blanket stitches to conceal them.
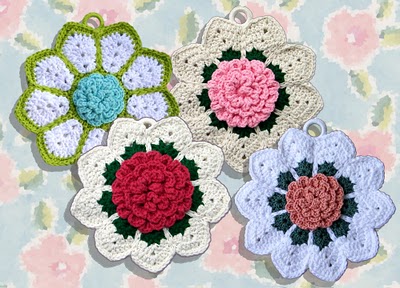
Variations: Here are color and yarn variations to this pattern. The potholder with the lime green border has a rose made of "I Love This Cotton!". The peach rose and green leaves rounds (lower right of the four potholders together) are crocheted using Tahki Cotton Classic yarns.


To make the Rose Ripple Potholder, you will need a G hook and three colors:
Foundation: With color A, ch 4, sl st to form a ring. تبدأي ب 4 سلاسل وتقفليهم بمنزلقه عشان تتحصلي عالدائرة
Round 1: ch 3 to count as first hdc. 8 hdc. (9) Do not join. Mark the first ch 3 with a small piece of contrasting yarn at the base. (9) Rounds 1-2 will be a continuous spiral; do not join, continue in a spiral.
Round 2: ****ing in back loops, only, make 2 hdc in each st around (18). Do not join.
Round 3: ****ing in back loops, only, make 2 hdc in each st. Sl st in the back loop of the next st to end the row and break off. (36)
Round 4-6: Still using color A, join with a sl st in the front loop of the first ch 3/hdc that is marked by piece of contrasting yarn. Once you determine this starting st, you can remove the marker and then (ch 3, 3 dc, ch 3, sl st) in that same front loop.
In the next 9 front loops in the spiral: (sl st, ch 3, 3 dc, ch 3, sl st). Total of 10 petals.
From here to the end of the spiral, crochet the same sequence: (sl st, ch 3, 3 dc, ch 3, sl st) in every other front loop: Break off color, bring all yarn tails to the back of this rose and secure the ends.
Round 7: Using color B (leaves), 3 ch in any back loop of the rose to count as first dc. In the same st: dc, ch 2, 2 dc. Ch 1. *Skip 3 back loops, in the fourth back loop: (2 dc, ch 2, 2 dc) ch 1. Repeat from * around for a total of 9 of these sets.
Round 7 is the same as the round nearest to the center in the diagram below.
NOTE: on Rounds 8-11, skip over two stitches from the end of one ripple and two more stitches to start the next ripple. In other words, there are four stitches skipped between ripples. The skipped stitches are seen in red-orange in the diagram below.
Round 8: *In ch 2 sp, (3 dc, ch 2, 3 dc). Repeat from * in all ch 2 spaces around. Break off color.
Round 9: This will a round in which there are four dc's going up the ripple to the peak and then, after 2 ch's, four going down to the valley.
With color C (background color), join in any ch 2 sp. Ch 3 (to serve as first dc), dc, ch 2, 2 dc, 2 dc in the top of the next dc, Skip over 4 dc’s and in the top of the one before the ch 2 sp, 2 dc. *In the ch 2 sp, (2 dc, ch 2, 2 dc). 2 dc in the next st. Repeat from * around and end with 2 dc in the st before the cluster in the ch 2 sp. Sl st to join round.
Round 10: This will be a round in which there will be five dc’s going up the ripple to the peak and 5 going down to the valley.
Sl st to start in the ch 2 sp. In the ch 2 space, ch 3 (first dc), dc, ch 2, 2 dc . Dc in the next st, 2 dc in the next st, Skip four st. 2 dc after the second st in the ripple. 1 dc in the next st. *In the ch 2 sp (2 dc, ch 2, 2 dc). Dc in the next st, 2 dc in the next st. Skip four st. 2 dc in the next st, 1 dc in the next st. Repeat from * around. Join with a sl st to complete the round.
Round 11: This will be a round of hdc’s instead of dc’s. There will be six hdc’s up the ripple to the peak and six going down the ripple to the valley.
Starting in the ch 2 space: (ch 2, hdc, ch 2, 2 hdc), 1 hdc in each of the next 2 st's, 2 hdc in the next st. Skip four st's. 2 hdc in the next st, 1 hdc in each of the next 2 st's. *in ch 2 sp **** (2 hdc, ch 2, 2 hdc), 1 hdc in each of the next 2 st's, 2 hdc in the next st. Skip 4 st's, 2 hdc in the next st, 1 hdc in each of the next 2 st's. Repeat from * around. Join with a sl st to end the round. Break off leaving a 7-inch tail.
This completes side one of your Rose Ripple Potholder. The only difference between sides one and two is in the center. The yellow in the center is flat, no rose is made. The three rounds of hdc, instead of being ****ed in a spiral in back loops, is made the usual way:
Joining round: For the joining round, a potholder in other colors will be used so you can see the contrasting stitch colors better than using white on white as in the above example.