رائع
وخصوصا بطانيات الاطفال
مشكورة حبيبتى
رائع
وخصوصا بطانيات الاطفال
مشكورة حبيبتى
رائع وخصوصا بطانيات الاطفال مشكورة حبيبتىرائع وخصوصا بطانيات الاطفال مشكورة حبيبتى
:27: فعلاً أكثر ما عجيني البطانيات .. لو عملت وحدة منهم ما رح ألرفعها عن نفسي :o أنتِ الأجمل بتشريفكِ للموضوع .. :27: و كل سنه و أنتِ طيبة :27: تسلمي على التشجيع .. و كل سنه و أنتِ طيبة:27: فعلاً أكثر ما عجيني البطانيات .. لو عملت وحدة منهم ما رح ألرفعها عن نفسي :o أنتِ...
يسلمووووووو الايادي كلهم روعه وكل عام وانتي بخيريسلمووووووو الايادي كلهم روعه وكل عام وانتي بخير
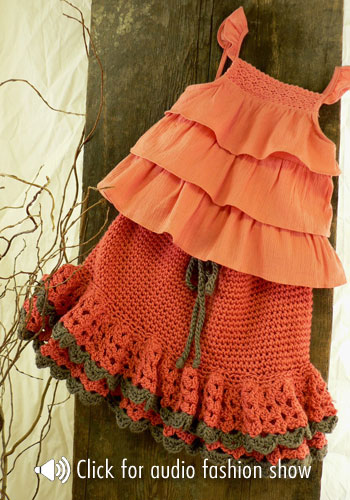
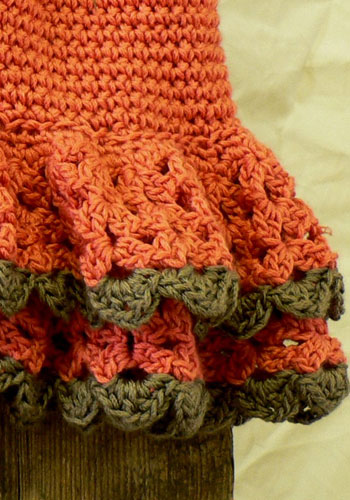
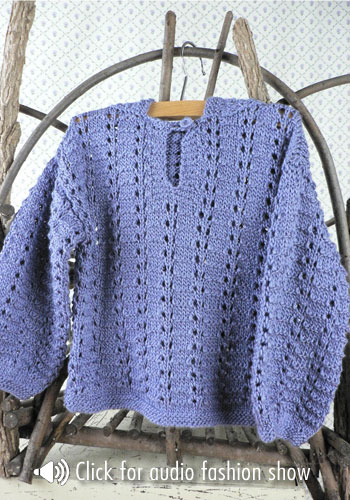
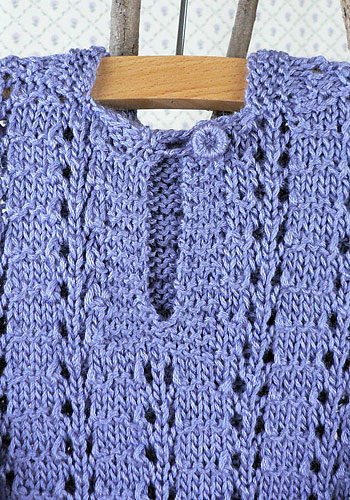
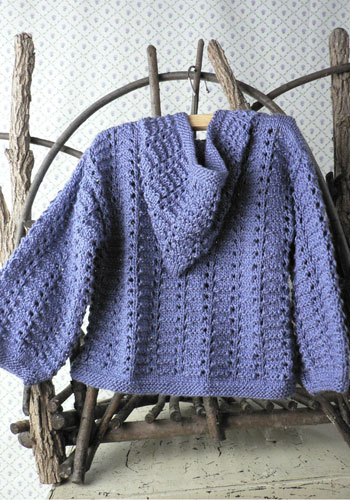
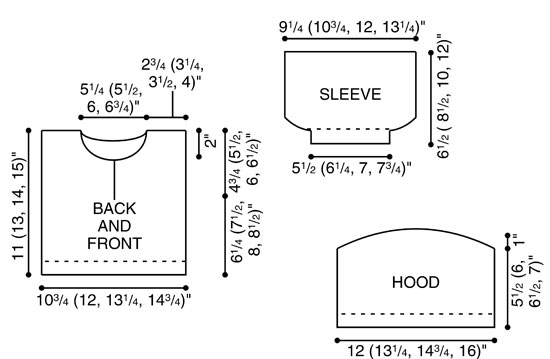
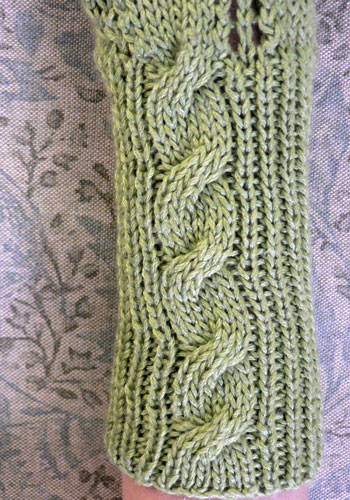
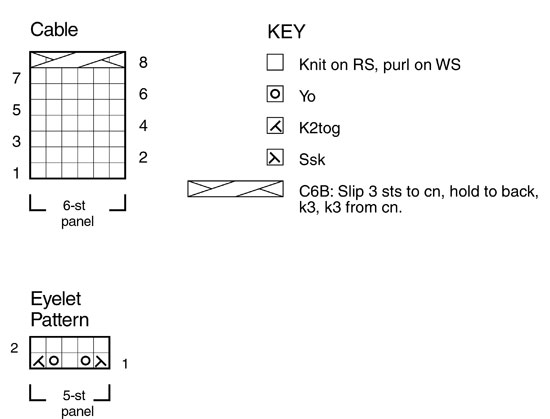
(8) .. .. SIZES X-Small (Small, Medium, Large) To fit: Baby size 6-12 mo (12-18 mo, child's 2-4, 6) FINISHED MEASUREMENTS: Chest: 20 1/2 (23, 25 1/2, 28 1/2)"/52 (58.5, 65, 72) cm Length 11 (13, 14, 15)" /28 (33, 35.5, 38) cm GAUGE In Stockinette stitch, 22 sts and 30 rows = 4"/10 cm, using larger needles; in Texture patt, after blocking, 19 – 21 sts = 4"/10 cm Note: Texture pattern is very flexible; garment may be blocked larger or smaller than stated, if desired. ABBREVIATIONS k1-f/b (increase): Knit next st, then knit it through the back loop. k2tog (decrease): Knit 2 sts together through the front loops. p2tog (decrease): Purl 2 sts together through the front loops. ssk (decrease): Slip 2 sts, one at a time knitwise, to right-hand needle, return sts to left-hand needle in turned position and knit them together through the back loops. yo (increase): If last st was purl, next st is to be knit: With yarn in front (purl position), carry yarn over the needle to back, ready to knit the next stitch. If last st was knit, next st is to be purl: With yarn in back (knit position), bring it to the front between the needles, (purl position), then carry it over the needle, and between needles to front once more, ready to purl the next stitch. KNIT STITCHES USED Garter stitch: Knit all sts every row. Stockinette stitch (St st): Knit on RS, purl on WS. Texture Pattern (multiple of 7 sts) Row 1 (RS): * P1, p2tog, yo, k1, yo, p2tog, p1; repeat from * across. Row 2: Purl. Row 3: Knit. Row 4: Purl. Repeat Rows 1 – 4 for Texture patt. CROCHET STITCHES USED Chain (ch): Begin by joining yarn with a slip st to edge of garment. * Wrap the yarn around the hook (yarn over) and pull up a loop, [draw the yarn through the loop on the hook to form the first chain]. Repeat from * for length desired. NOTE Blocking is very important after completing pieces; lay flat and spray with warm water; pin to measurements and allow to air dry. HOOD Using larger needles, cast on 60 (66, 72, 79) sts. (RS) Begin Garter st; work even for 6 rows, end with a WS row. (RS) Knit, inc 3 (4, 5, 5) sts evenly across by k1-f/b—63 (70, 77, 84) sts. (WS) Purl 1 row. (RS) Begin Texture patt; work even until piece measures 5 1/2 (6, 6 1/2, 7)", end with (RS) Row 1 of patt. Shape Hood (WS) Bind off 8 (9, 10, 11) sts at beg of next 6 rows—15 (16, 17, 18) sts remain. (WS) Bind off 8 (8, 9, 9) sts at beg of next row, bind off rem sts. BACK Using larger needles, cast on 56 (63, 70, 77) sts. (RS) Begin Garter st; work even for 6 rows, end with a WS row. (RS) Begin St st; work even for 2 rows, end with a WS row. (RS) Begin Texture patt; work even until piece measures 10 1/2 (12 1/2, 13 1/2, 14 1/2)" from beginning, end with a WS row; pm each side of center 26 (27, 30, 33) sts for back neck. Shape Neck (RS) Continue in patt, work across to 2 sts before first marker, k2tog, remove marker, turn, leaving remaining sts unworked—14 (17, 19, 21) sts for right shoulder. (WS) Purl. Bind off shoulder sts. With RS facing, join yarn at neck edge, bind off neck sts, ssk, work to end in patt—14 (17, 19, 21) sts remain for left shoulder. (WS) Purl. Bind off shoulder sts. FRONT Work as for Back until piece measures 6 1/2 (8 1/2, 9 1/2, 10 1/2)" from beginning, end with (WS) Row 2 of patt; pm each side of center 8 (9, 8, 9) sts. Establish Placket (RS) Continue in patt, work across to first marker; slip marker, k8 (9, 8, 9) for placket (keep in Garter st), slip marker; work in patt to end. Continue as established, working sts between markers in Garter st, remaining sts in patt, for 5 rows, end with a WS row. Shape Neck Opening (RS) Work across to marker; slip marker, k4; join a second ball of yarn, k0 (k2tog, 0, k2tog), k4 (3, 4, 3), work in patt to end—4 sts each side of neck opening in Garter st; 28 (31, 35, 38) sts total each side of opening. Working both side at same time, continue as established, work even until piece measures 9 (11, 12, 13)" from beginning, end with a WS row. At each neck edge, bind off 6 (6, 6, 7) sts once, then 4 (4, 5, 5) sts twice—14 (17, 19, 21) sts remain each side for shoulders. Work even until piece measures same as Back to shoulder. Bind off remaining sts. SLEEVES Using smaller needles, cast on 31 (35, 39, 43) sts. (RS) Begin Garter st; work even for 6 rows, end with a WS row. Change to larger needles and St st. (RS) Beginning this row,inc 6 (7, 8, 9) sts evenly across every other row 3 times, end with a WS row—49 (56, 63, 70) sts. (RS) Begin Texture patt; work even until piece measures 6 1/2 (8 1/2, 10, 12)" from beginning, or desired length to underarm, end with WS row. Bind off all sts loosely in patt. FINISHING Block pieces to measurements. Measure down approx 4 3/4 (5 1/2, 6, 6 1/2)" from shoulder each side, Back and Front. Sew shoulder seams. Sew sleeves between markers; sew sleeve and side seams. Sew Hood around neck shaping, stopping 1" each side of Placket on Fronts, easing to fit (see photo). Button loop Using crochet hook, join yarn with a slip st to right Front Placket edge; chain 15, or length to fit button, join with a slip st to same st at Placket edge. Sew button on left Front, opposite button loop. Using yarn needle, weave in all ends.(8) .. .. SIZES X-Small (Small, Medium, Large) To fit: Baby size 6-12 mo...
و كل عام و أنتِ إلى الله أقرب :27:
:27:
شكراً .. و كل سنه و أنتِ بخير و سلامة يارب :27: