..
FINISHED MEASUREMENTS:
Throw measures approximately 50"/127 cm wide x 64"/162.5 cm long
GAUGE
Using G-6 (4 mm) hook, Motif A (or B) = 7 x 7"/18 x 18 cm.
STITCHES USED
Chain (ch), double crochet (dc), half double crochet (hdc), single crochet (sc), slip stitch (slip st), treble crochet (tr)
SPECIAL TERMS
Beginning treble cluster (beg tr-cl): Ch 4, yarn over twice, insert hook in indicated stitch, yarn over and draw up a loop, [yarn over and draw through 2 loops on hook] twice (2 loops on hook), yarn over twice, insert hook in same stitch, yarn over and draw up a loop, [yarn over and draw through 2 loops on hook] twice (3 loops on hook), yarn over and draw through all 3 loops on hook.
Treble cluster (tr-cl): Yarn over twice, insert hook in indicated stitch, yarn over and draw up a loop, [yarn over and draw through 2 loops on hook] twice (2 loops on hook); *yarn over twice, insert hook in same stitch, yarn over and draw up a loop, [yarn over and draw through 2 loops on hook] twice; repeat from * once more, yarn over and draw through all 4 loops on hook.
Single crochet 3 together (sc3tog): Insert hook in next stitch, yarn over and draw up a loop, (2 loops on hook), [insert hook in next stitch, yarn over and draw up a loop] twice, yarn over and draw through all 4 loops on hook.
SPECIAL TECHNIQUE
Double-ring method: Holding the yarn a few inches from the end, wrap twice around your fingers. Remove rings from fingers and grip two rings and tail firmly between middle finger and thumb. Insert hook through center of ring and draw up a loop. Yarn over and draw through loop on hook. Work stitches of first round in the rings. Pull gently, but firmly, on tail to tighten ring.
NOTES
1. Motif C is joined to Motifs A and B as you work Round 4.
2. If desired, Motifs A and B can be joined to each other in manner similar to that used for joining Motif C. Drop the loop of the center tr on last Round and insert hook in corresponding tr on adjacent Motif, insert hook back into dropped loop and draw it through loop on hook. Continue with instructions to next center tr.
3. To change color when joining a round: insert hook in first stitch of round, yarn over with new color and draw through both loops on hook. Fasten off old color.
3. Weaving in ends as each Motif is completed makes finishing much easier.
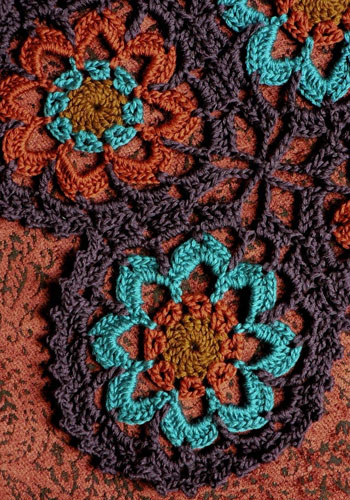
MOTIF A (make 32)
With A, form a ring using the double-ring method (see above).
Round 1 (RS): Work 8 sc in ring; join with slip st in first sc—8 sc.
Pull gently, but firmly, on tail to tighten ring.
Round 2: Beg tr-cl in same sc as join, ch 4, [tr-cl in next sc, ch 4] 7 times; join with slip st in top of beg tr-cl, changing to B—8 tr and 8 ch-4 spaces. Fasten off A.
Round 3: With B, ch 1, 6 sc in each ch-4 space around; join with slip st in first sc changing to D—48 sc. Fasten off B.
Round 4: With D, [ch 5, skip next 2 sc, sc in next sc] 16 times; join with slip st in first ch—16 sc and 16 ch-5 spaces.
Round 5: Slip st in first ch-5 space, ch 3 (counts as first dc), 2 dc in same ch-5 space, ch 1, [3 dc in next ch-5 space, ch 1] 15 times; join with slip st in top of beginning ch-3—48 dc and 16 ch-1 spaces. Fasten off D.
Round 6: Join C with slip st in any ch-1 space, ch 1, sc in same ch-1 space, ch 7, [sc in next ch-1 space, ch 7] 15 times; join with slip st in first sc—16 sc and 16 ch-7 spaces.
Round 7: 5 sc in each ch-7 space around; join with slip st in first sc, changing to A—80 sc. Fasten off C.
Round 8: With A, ch 5 (counts as tr, ch 1), (tr, ch 1, tr) in same sc as join (corner made), dc in next 2 sc, hdc in next sc, sc in next 3 sc, hdc in next sc, dc in next 2 sc, *(tr, ch 1, tr, ch 1, tr) in next sc (corner made), dc in next 2 sc, hdc in next sc, sc in next 3 sc, hdc in next sc, dc in next 2 sc; repeat from * around; join with slip st in fourth ch of beginning ch-5—8 corners, 32 dc, 16 hdc, and 24 sc. Fasten off.
MOTIF B (make 31)
With B, form a ring using the double-ring method.
Round 1 (RS): Work 8 sc in ring; join with slip st in first sc—8 sc.
Pull gently, but firmly, on tail to tighten ring.
Round 2: Ch 4 (counts as tr), tr in same st as join, ch 2, [2 tr in next sc, ch 2] 7 times; join with slip st in top of beginning ch-4, changing to A—16 tr and 8 ch-2 spaces. Fasten off B.
Round 3: With A, ch 1, sc in same st as join, sc in next tr, 4 sc in next ch-2 space, [sc in next 2 tr, 4 sc in next ch-2 space] 7 times; join with slip st in first sc, changing to D—64 sc. Fasten off A.
Round 4: With D, ch 5 (counts as dc, ch 2), dc in same st as join, skip next 3 sc, [(dc, ch 2, dc) in next sc, skip next 3 sc] 15 times; join with slip st in third ch of beginning ch-5—32 dc and 16 ch-2 spaces. Fasten off.
Round 5: Join C with slip st in any ch-2 space, ch 6 (counts as dc, ch 3), dc in same ch-2 space, (dc, ch 3, dc) in each ch-2 sp around; join with slip st in 3rd ch of beginning ch; change to A in join—32 dc and 16 ch-3 spaces. Fasten off C
Round 6: With A, slip st in first ch-3 space, ch 4 (counts as tr), 2 tr in same ch-3 space, ch 1, (tr, ch 1, tr, ch 1, tr) in next ch-3 space, *ch 1, 3 tr in next ch-3 space, ch 1, (tr, ch 1, tr, ch 1, tr) in next ch-3 space; repeat from * around; ch 1, join with slip st in top of beginning ch-4, changing to B—48 tr and 32 ch-1 spaces. Fasten off A.
Round 7: With B, ch 1, sc in same st as join, sc in next 2 tr, *hdc in next ch-1 space, dc in next tr, dc in next ch-1 space, (tr, ch 1, tr, ch 1, tr) in next tr (corner made), dc in next ch-1 space, dc in next tr, hdc in next ch-1 space, sc in next 3 tr; repeat from * 6 more times, hdc in next ch-1 space, dc in next tr, dc in next ch-1 space, (tr, ch 1, tr, ch 1, tr) in next tr (corner made), dc in next ch-1 space, dc in next tr, hdc in next ch-1 space; join with slip st in first sc—24 sc, 16 hdc, 32 dc, 24 tr, and 16 ch-1 spaces. Fasten off.
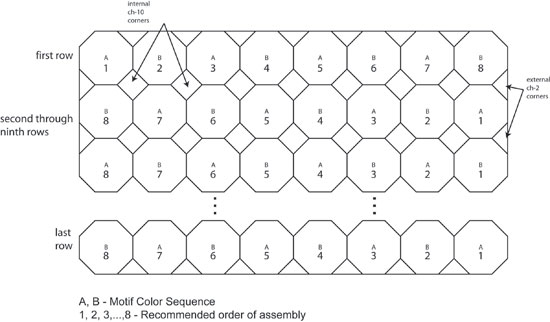
ASSEMBLY
Referring to chart for placement, sew Motifs A and B together at center tr of each corner. (Alternatively, you can join using the method described in Note #2 above).
MOTIF C (make 48)
With A, form a ring using the double-ring method.
Round 1 (RS): Ch 5 (counts as dc, ch 2), [dc in ring, ch 2] 7 times; join with slip st in third ch of beginning ch-5, changing to B—8 dc and 8 ch-2 spaces. Fasten off A.
Pull gently, but firmly, on tail to tighten ring.
Round 2: With B, slip st in first ch-2 space, ch 6 (counts as dc, ch 3), dc in same ch-2 space, (dc, ch 3, dc) in each ch-2 space around, join with slip st in third ch of beginning ch-6, changing to D—16 dc and 8 ch-3 spaces. Fasten off B.
Round 3: With D, ch 1, sc in same st as join, [4 sc in next ch-3 space, sc in next 2 dc] 7 times, 4 sc in next ch-3 space, sc in last dc; join with slip st in first sc, changing to C—48 sc. Fasten off D.
Note: Work Round 4 with RS of throw and C Motifs facing you.
Round 4 (motif joining): With C, ch 1, *sc in next 3 sc; ch 3, drop loop from hook, insert hook in joining of Motifs A and B, insert hook back into dropped loop and draw it through the loop on hook, ch 3 (motif join made); sc in next 6 sc; work motif join in center sc of corresponding Motif; sc in next 3 sc; repeat from * around; join with slip st in first sc.
Edging
With RS facing and working around edges of throw, join C with slip st in the center tr of any motif corner.
Round 1: Ch 1, 3 sc in same st, sc in next ch-1 space, sc in next tr, sc in next 2 dc, sc in next hdc, sc3tog, sc in next hdc, sc in next 2 dc, sc in next tr, sc in next ch-1 space, *3 sc in next tr, sc in next ch-1 space, sc in next tr, sc in next 2 dc, sc in next hdc, sc3tog, sc in next hdc, sc in next 2 dc, sc in next tr, sc in next ch-1 space; repeat from * around; join with slip st in first sc. Fasten off.
FINISHING
Using yarn needle, weave in all remaining ends.
Fringe
Cut 112 strands of C, 12"/30.5 cm long (using cardboard, if desired). Hold 4 strands together for each fringe and fold fringe in half, forming a loop. Insert crochet hook into center tr of a motif corner, insert hook into loop formed in folded strands and draw loop through motif corner. Draw ends of folded strands through loop and gently pull to tighten. Repeat to attach fringe to every motif corner across short ends of throw.
..
FINISHED MEASUREMENTS:
Throw measures approximately 50"/127 cm wide x 64"/162.5 cm...

..
FINISHED MEASUREMENTS:
Throw measures approximately 50"/127 cm wide x 64"/162.5 cm long
GAUGE
Using G-6 (4 mm) hook, Motif A (or B) = 7 x 7"/18 x 18 cm.
STITCHES USED
Chain (ch), double crochet (dc), half double crochet (hdc), single crochet (sc), slip stitch (slip st), treble crochet (tr)
SPECIAL TERMS
Beginning treble cluster (beg tr-cl): Ch 4, yarn over twice, insert hook in indicated stitch, yarn over and draw up a loop, twice (2 loops on hook), yarn over twice, insert hook in same stitch, yarn over and draw up a loop, twice (3 loops on hook), yarn over and draw through all 3 loops on hook.
Treble cluster (tr-cl): Yarn over twice, insert hook in indicated stitch, yarn over and draw up a loop, twice (2 loops on hook); *yarn over twice, insert hook in same stitch, yarn over and draw up a loop, twice; repeat from * once more, yarn over and draw through all 4 loops on hook.
Single crochet 3 together (sc3tog): Insert hook in next stitch, yarn over and draw up a loop, (2 loops on hook), twice, yarn over and draw through all 4 loops on hook.
SPECIAL TECHNIQUE
Double-ring method: Holding the yarn a few inches from the end, wrap twice around your fingers. Remove rings from fingers and grip two rings and tail firmly between middle finger and thumb. Insert hook through center of ring and draw up a loop. Yarn over and draw through loop on hook. Work stitches of first round in the rings. Pull gently, but firmly, on tail to tighten ring.
NOTES
1. Motif C is joined to Motifs A and B as you work Round 4.
2. If desired, Motifs A and B can be joined to each other in manner similar to that used for joining Motif C. Drop the loop of the center tr on last Round and insert hook in corresponding tr on adjacent Motif, insert hook back into dropped loop and draw it through loop on hook. Continue with instructions to next center tr.
3. To change color when joining a round: insert hook in first stitch of round, yarn over with new color and draw through both loops on hook. Fasten off old color.
3. Weaving in ends as each Motif is completed makes finishing much easier.
MOTIF A (make 32)
With A, form a ring using the double-ring method (see above).
Round 1 (RS): Work 8 sc in ring; join with slip st in first sc—8 sc.
Pull gently, but firmly, on tail to tighten ring.
Round 2: Beg tr-cl in same sc as join, ch 4, 7 times; join with slip st in top of beg tr-cl, changing to B—8 tr and 8 ch-4 spaces. Fasten off A.
Round 3: With B, ch 1, 6 sc in each ch-4 space around; join with slip st in first sc changing to D—48 sc. Fasten off B.
Round 4: With D, 16 times; join with slip st in first ch—16 sc and 16 ch-5 spaces.
Round 5: Slip st in first ch-5 space, ch 3 (counts as first dc), 2 dc in same ch-5 space, ch 1, 15 times; join with slip st in top of beginning ch-3—48 dc and 16 ch-1 spaces. Fasten off D.
Round 6: Join C with slip st in any ch-1 space, ch 1, sc in same ch-1 space, ch 7, 15 times; join with slip st in first sc—16 sc and 16 ch-7 spaces.
Round 7: 5 sc in each ch-7 space around; join with slip st in first sc, changing to A—80 sc. Fasten off C.
Round 8: With A, ch 5 (counts as tr, ch 1), (tr, ch 1, tr) in same sc as join (corner made), dc in next 2 sc, hdc in next sc, sc in next 3 sc, hdc in next sc, dc in next 2 sc, *(tr, ch 1, tr, ch 1, tr) in next sc (corner made), dc in next 2 sc, hdc in next sc, sc in next 3 sc, hdc in next sc, dc in next 2 sc; repeat from * around; join with slip st in fourth ch of beginning ch-5—8 corners, 32 dc, 16 hdc, and 24 sc. Fasten off.
MOTIF B (make 31)
With B, form a ring using the double-ring method.
Round 1 (RS): Work 8 sc in ring; join with slip st in first sc—8 sc.
Pull gently, but firmly, on tail to tighten ring.
Round 2: Ch 4 (counts as tr), tr in same st as join, ch 2, 7 times; join with slip st in top of beginning ch-4, changing to A—16 tr and 8 ch-2 spaces. Fasten off B.
Round 3: With A, ch 1, sc in same st as join, sc in next tr, 4 sc in next ch-2 space, 7 times; join with slip st in first sc, changing to D—64 sc. Fasten off A.
Round 4: With D, ch 5 (counts as dc, ch 2), dc in same st as join, skip next 3 sc, 15 times; join with slip st in third ch of beginning ch-5—32 dc and 16 ch-2 spaces. Fasten off.
Round 5: Join C with slip st in any ch-2 space, ch 6 (counts as dc, ch 3), dc in same ch-2 space, (dc, ch 3, dc) in each ch-2 sp around; join with slip st in 3rd ch of beginning ch; change to A in join—32 dc and 16 ch-3 spaces. Fasten off C
Round 6: With A, slip st in first ch-3 space, ch 4 (counts as tr), 2 tr in same ch-3 space, ch 1, (tr, ch 1, tr, ch 1, tr) in next ch-3 space, *ch 1, 3 tr in next ch-3 space, ch 1, (tr, ch 1, tr, ch 1, tr) in next ch-3 space; repeat from * around; ch 1, join with slip st in top of beginning ch-4, changing to B—48 tr and 32 ch-1 spaces. Fasten off A.
Round 7: With B, ch 1, sc in same st as join, sc in next 2 tr, *hdc in next ch-1 space, dc in next tr, dc in next ch-1 space, (tr, ch 1, tr, ch 1, tr) in next tr (corner made), dc in next ch-1 space, dc in next tr, hdc in next ch-1 space, sc in next 3 tr; repeat from * 6 more times, hdc in next ch-1 space, dc in next tr, dc in next ch-1 space, (tr, ch 1, tr, ch 1, tr) in next tr (corner made), dc in next ch-1 space, dc in next tr, hdc in next ch-1 space; join with slip st in first sc—24 sc, 16 hdc, 32 dc, 24 tr, and 16 ch-1 spaces. Fasten off.
ASSEMBLY
Referring to chart for placement, sew Motifs A and B together at center tr of each corner. (Alternatively, you can join using the method described in Note #2 above).
MOTIF C (make 48)
With A, form a ring using the double-ring method.
Round 1 (RS): Ch 5 (counts as dc, ch 2), 7 times; join with slip st in third ch of beginning ch-5, changing to B—8 dc and 8 ch-2 spaces. Fasten off A.
Pull gently, but firmly, on tail to tighten ring.
Round 2: With B, slip st in first ch-2 space, ch 6 (counts as dc, ch 3), dc in same ch-2 space, (dc, ch 3, dc) in each ch-2 space around, join with slip st in third ch of beginning ch-6, changing to D—16 dc and 8 ch-3 spaces. Fasten off B.
Round 3: With D, ch 1, sc in same st as join, 7 times, 4 sc in next ch-3 space, sc in last dc; join with slip st in first sc, changing to C—48 sc. Fasten off D.
Note: Work Round 4 with RS of throw and C Motifs facing you.
Round 4 (motif joining): With C, ch 1, *sc in next 3 sc; ch 3, drop loop from hook, insert hook in joining of Motifs A and B, insert hook back into dropped loop and draw it through the loop on hook, ch 3 (motif join made); sc in next 6 sc; work motif join in center sc of corresponding Motif; sc in next 3 sc; repeat from * around; join with slip st in first sc.
Edging
With RS facing and working around edges of throw, join C with slip st in the center tr of any motif corner.
Round 1: Ch 1, 3 sc in same st, sc in next ch-1 space, sc in next tr, sc in next 2 dc, sc in next hdc, sc3tog, sc in next hdc, sc in next 2 dc, sc in next tr, sc in next ch-1 space, *3 sc in next tr, sc in next ch-1 space, sc in next tr, sc in next 2 dc, sc in next hdc, sc3tog, sc in next hdc, sc in next 2 dc, sc in next tr, sc in next ch-1 space; repeat from * around; join with slip st in first sc. Fasten off.
FINISHING
Using yarn needle, weave in all remaining ends.
Fringe
Cut 112 strands of C, 12"/30.5 cm long (using cardboard, if desired). Hold 4 strands together for each fringe and fold fringe in half, forming a loop. Insert crochet hook into center tr of a motif corner, insert hook into loop formed in folded strands and draw loop through motif corner. Draw ends of folded strands through loop and gently pull to tighten. Repeat to attach fringe to every motif corner across short ends of throw.